
A 35mm camera may look complex at first, but its basic design is easy to understand. The camera takes light through the lens, controls that light with the aperture and shutter, and records the image on 35mm film. Once you know the job of each part, using a film camera feels much less confusing.
The parts of a 35mm camera can vary by model. A simple point-and-shoot has fewer controls than a manual 35mm SLR. Still, the core parts stay much the same. This guide explains those parts in simple terms and shows how they work together when you take a photo.
What Are the Main Parts of a 35mm Camera?
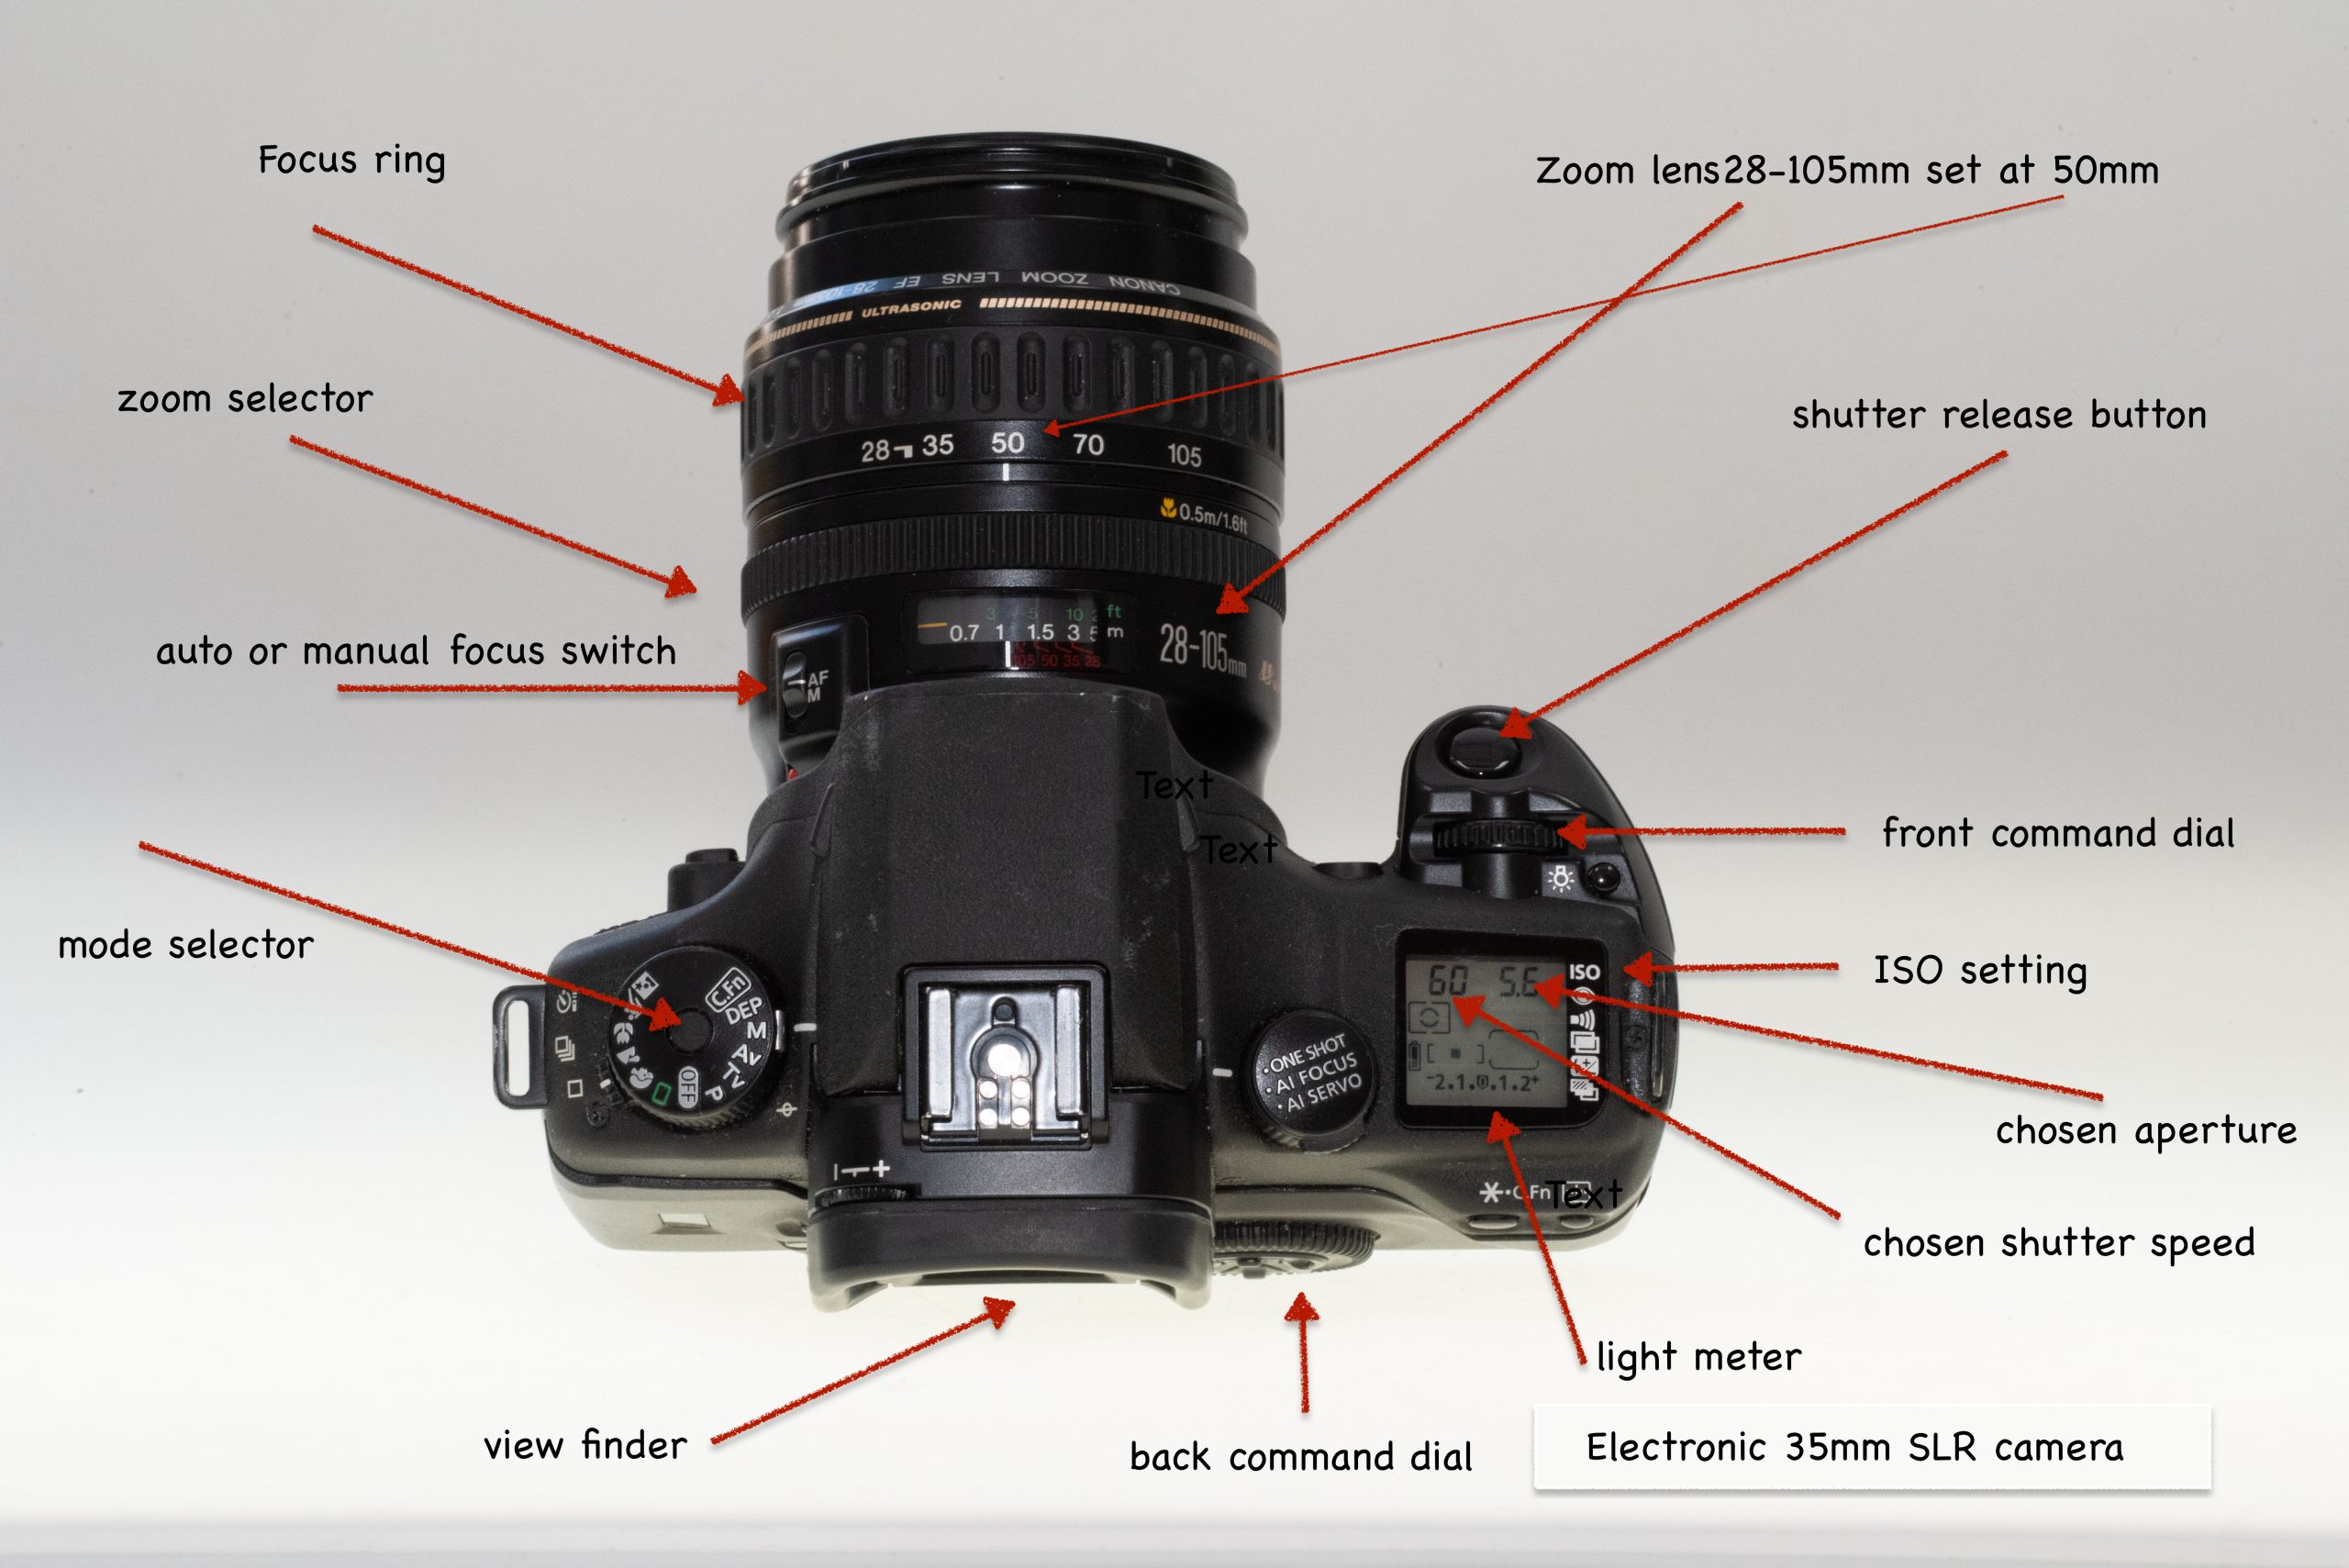
The parts of a 35mm camera fall into a few simple groups. The lens handles light and focus. The shutter controls how long the film sees that light. The film chamber holds the film, while the viewfinder helps you frame the scene.
Other parts control exposure and move the film. These include the aperture ring, shutter-speed dial, film advance lever, rewind release, rewind crank, and exposure meter on some models. Together, these parts turn a scene in front of you into a picture on film.
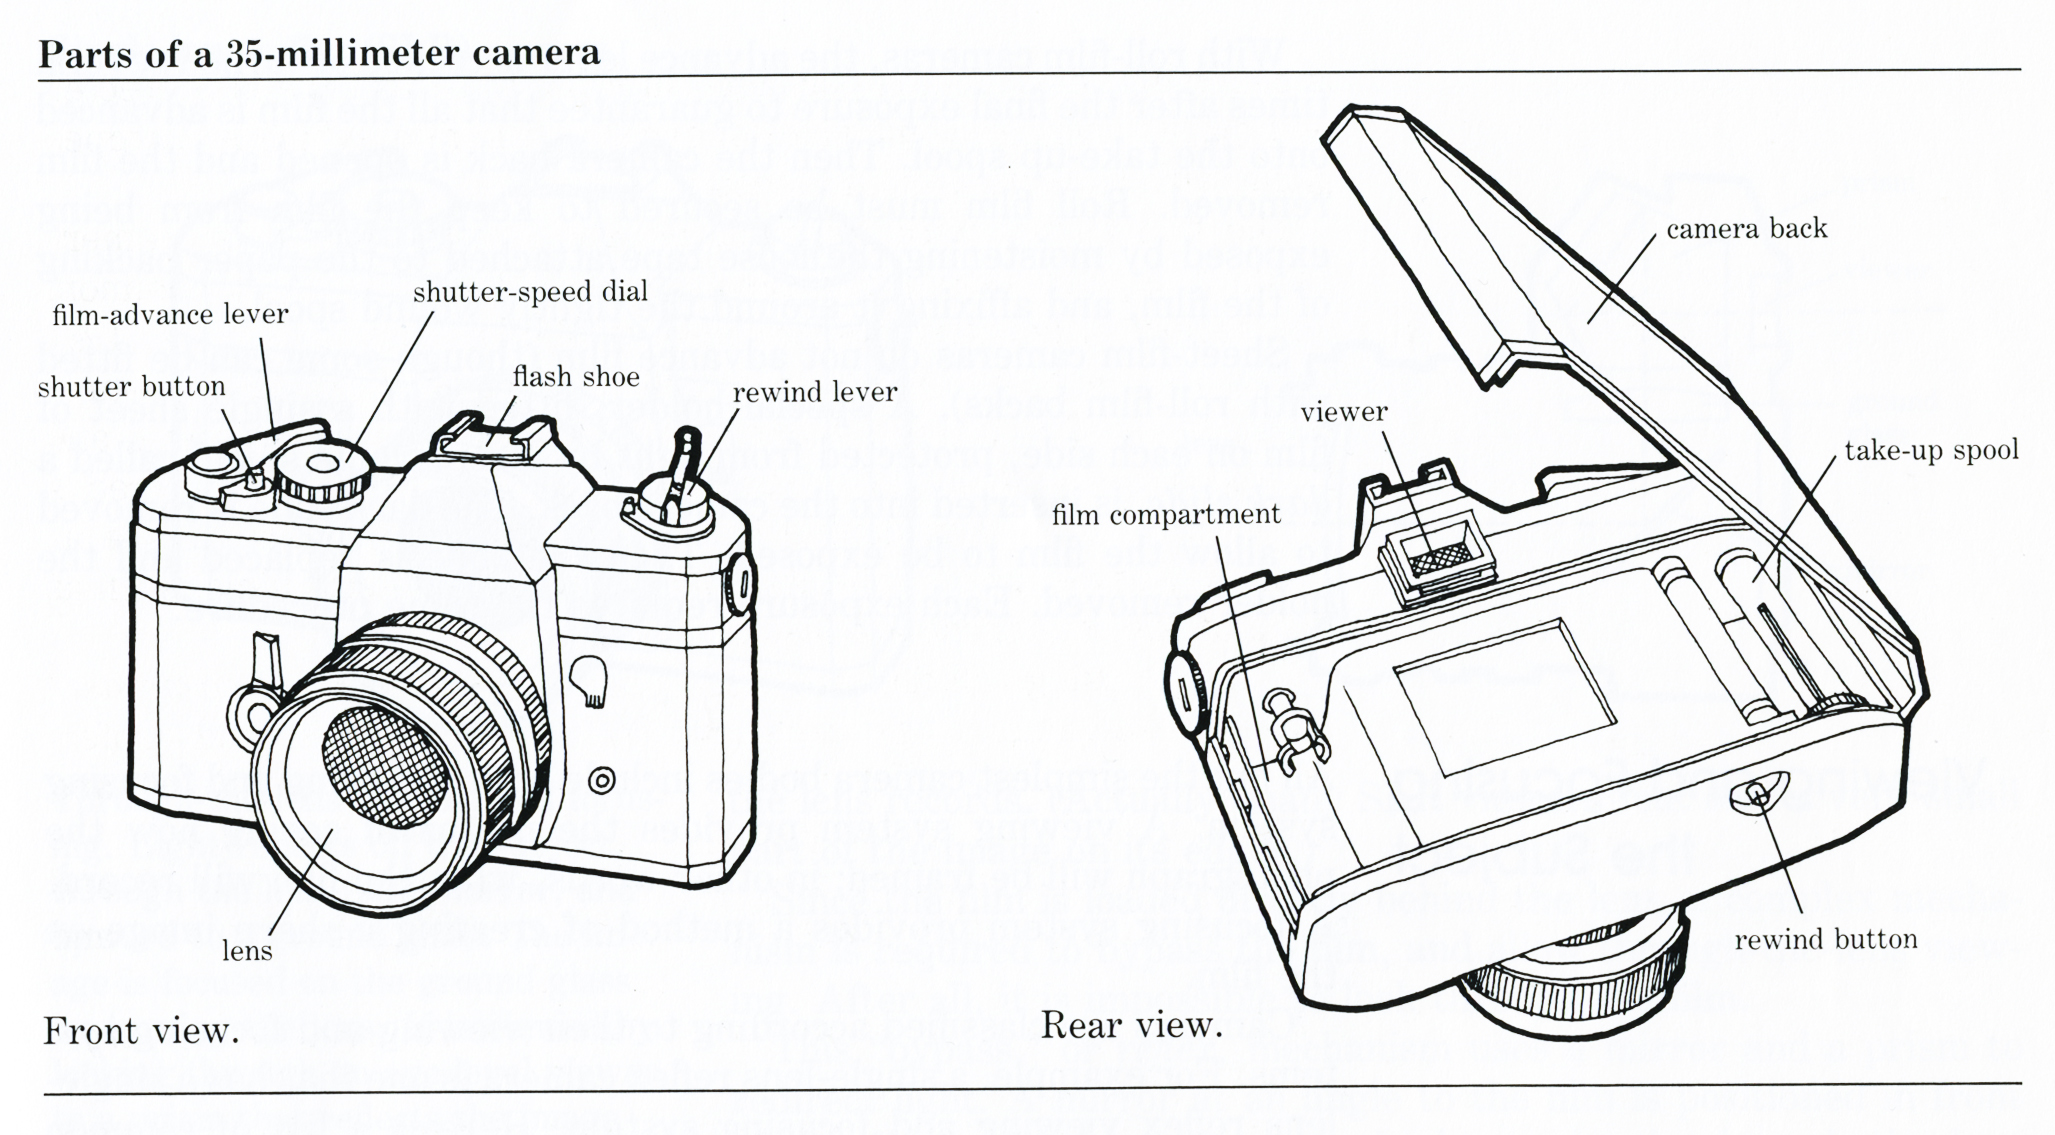
- ✦ Lens
The lens gathers light and forms the image that reaches the film.
- ✦ Shutter
The shutter opens for a set time so light can reach the film.
- ✦ Aperture
The aperture controls the size of the opening inside the lens and affects both exposure and depth of field.
- ✦ Film chamber
The film chamber holds the 35mm film cartridge before and during use.
- ✦ Viewfinder
The viewfinder lets you see and frame the subject before taking the picture.
- ✦ Film advance lever
The lever moves the film to the next frame and prepares the camera for another exposure.
- ✦ Rewind crank
The rewind crank winds exposed film back into its cartridge after the roll is finished.
- ✦ Shutter-speed dial
This control sets how long the shutter stays open on many manual cameras.
Why the Camera Parts Work as a System
A useful way to learn the parts of a 35mm camera is to follow the path of light. Light enters through the lens, passes through the aperture, and reaches the shutter. When the shutter opens, that light reaches the film and creates the exposure.
This simple path explains why one control can affect another. A wider aperture lets in more light. A faster shutter speed lets in light for less time. The photographer balances these settings to get the desired exposure.
- ✦ Light enters
The lens collects light from the scene in front of the camera.
- ✦ Light is controlled
The aperture and shutter control how much light reaches the film.
- ✦ The image is recorded
The film reacts to the light and stores a latent image that later becomes visible during processing.
The Camera Lens and Its Main Parts
The lens is one of the most important parts of a 35mm camera. It gathers light and focuses that light to form a sharp image on the film plane. Different lenses can change the view, magnification, and look of a photograph.
A standard 35mm camera may use a fixed lens or an interchangeable lens. Many SLR cameras let you remove the lens and attach another one. This gives photographers more control over wide scenes, distant subjects, portraits, and close-up work.

- ✦ Front lens element
This is the glass at the front of the lens. It is one of the first surfaces that light passes through.
- ✦ Focus ring
The focus ring changes the position of lens elements so the subject appears sharp on the film.
- ✦ Aperture ring
On many manual lenses, this ring selects the f-stop and controls the lens opening.
- ✦ Focusing distance scale
This scale shows approximate focusing distances and can help with manual focus.
- ✦ Lens mount
The mount connects an interchangeable lens to the camera body.
How the Aperture Works
The aperture is an adjustable opening inside the lens. A wide opening lets in more light. A small opening lets in less light. Aperture settings are often shown as f-numbers such as f/2.8, f/4, f/8, and f/16.
Aperture also changes depth of field. A wide aperture can make the background look soft, while a smaller aperture can keep more of the scene sharp. This makes the aperture one of the most useful parts of a 35mm camera for creative control.
- ✦ Wide aperture
Lets in more light and can create a shallower depth of field.
- ✦ Small aperture
Lets in less light and can keep more of the scene in focus.
The Shutter and Shutter Release
The shutter is another key part of a 35mm camera. It blocks light from reaching the film until you press the shutter release. It then opens for a chosen amount of time and closes again.
Shutter speed affects both exposure and motion. A fast speed can help freeze movement, while a slow speed can show motion blur. When using slow shutter speeds by hand, camera shake can also make the picture less sharp.
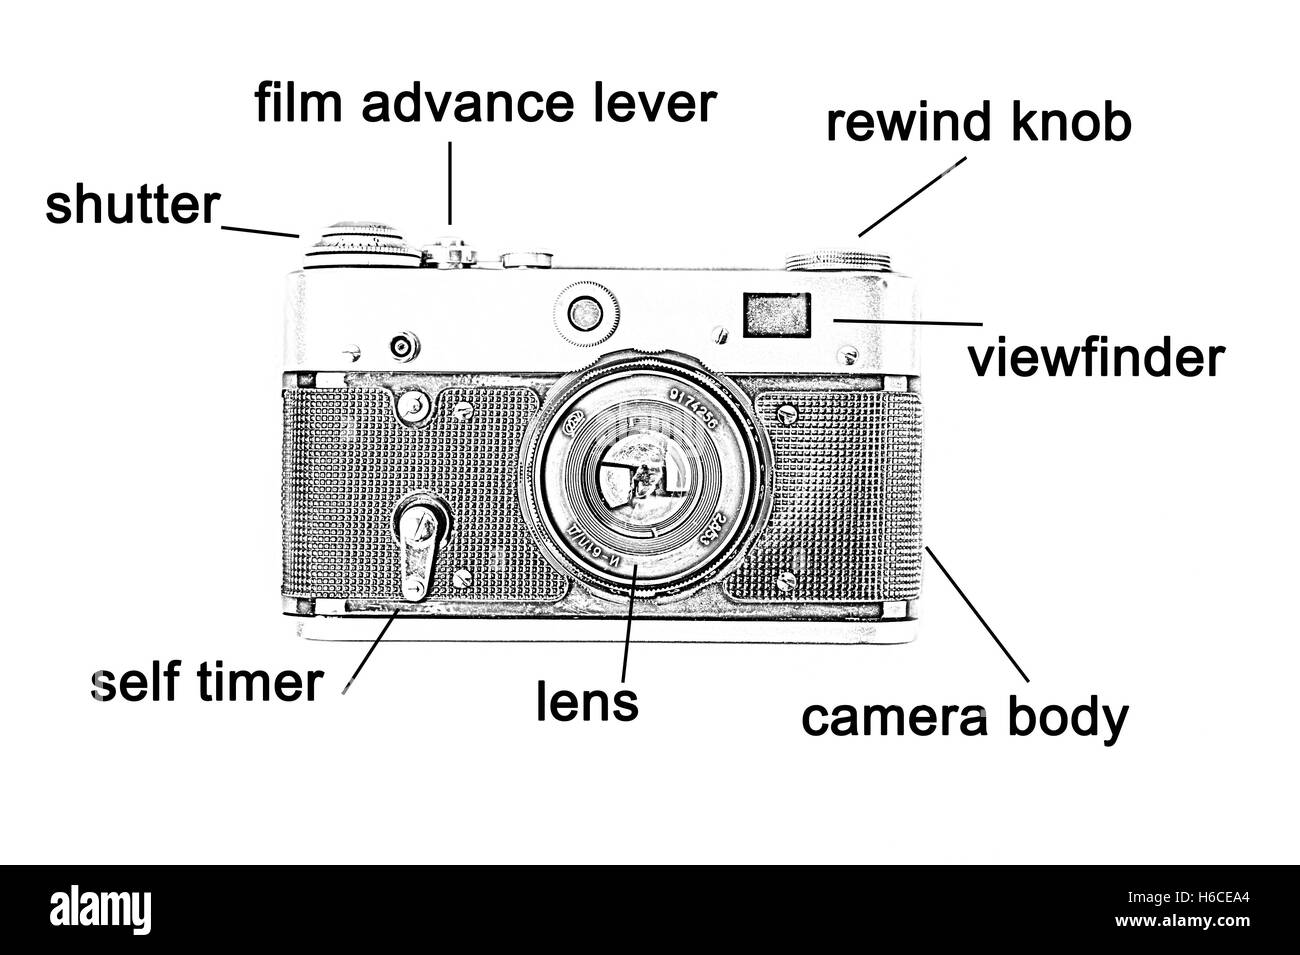
- ✦ Shutter blades or curtains
These parts open and close to control the time that light reaches the film.
- ✦ Shutter release button
Pressing this button activates the shutter and takes the photograph.
- ✦ Shutter-speed control
This control selects the exposure time on cameras that offer manual shutter-speed settings.
- ✦ Self-timer
Some 35mm cameras include a timer that delays the shutter release after you press the button.
Common Shutter Speeds
Many manual 35mm cameras offer a range of shutter speeds. Common settings include 1 second, 1/2 second, 1/4 second, 1/60 second, 1/125 second, 1/250 second, and 1/500 second. Some cameras offer even faster settings.
The right speed depends on the light and the movement in the scene. For a moving child, cyclist, or sports subject, a faster shutter can help. For a still subject in low light, a slower speed may work if the camera stays steady.
- ✦ Fast shutter
Useful for reducing motion blur from moving subjects.
- ✦ Slow shutter
Useful for low light and intentional motion effects, but it can increase camera shake.
The Film Chamber, Film Gate, and Pressure Plate
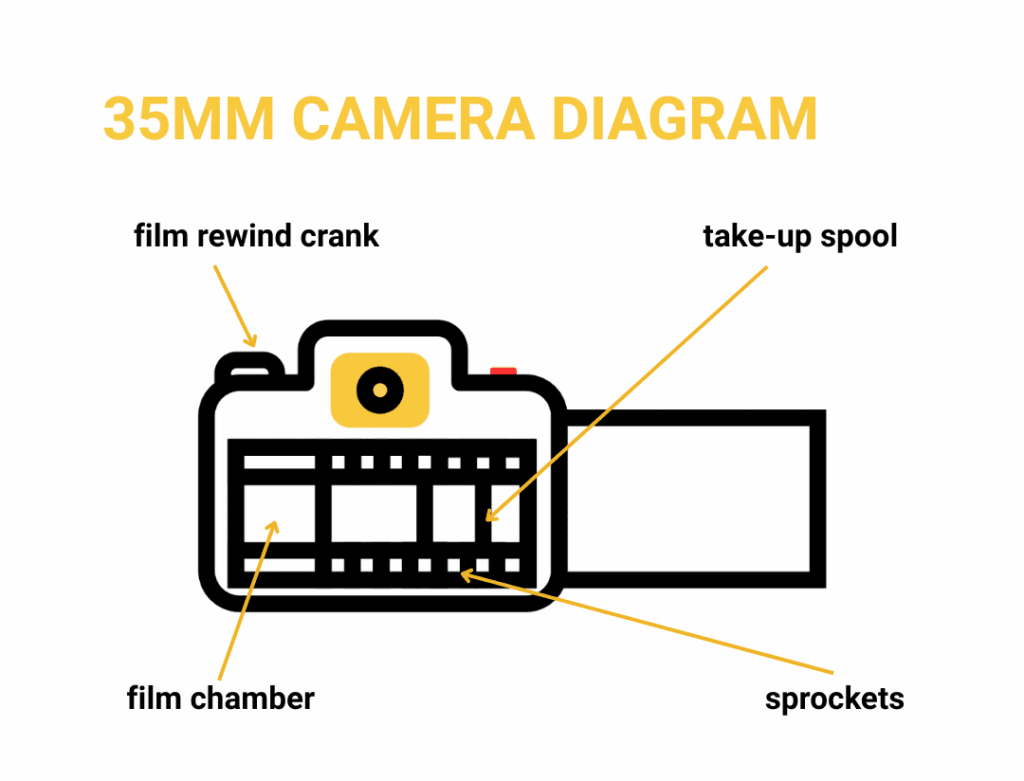
The film chamber is one of the most important internal areas in a 35mm camera. It holds the film cartridge and guides the film through the camera. The film must sit in the correct position so each frame lines up with the exposure area.
Inside many cameras, the film passes across a flat area called the film gate. A pressure plate helps keep the film flat against this area. This allows the camera to expose a consistent frame and helps maintain correct focus across the image.
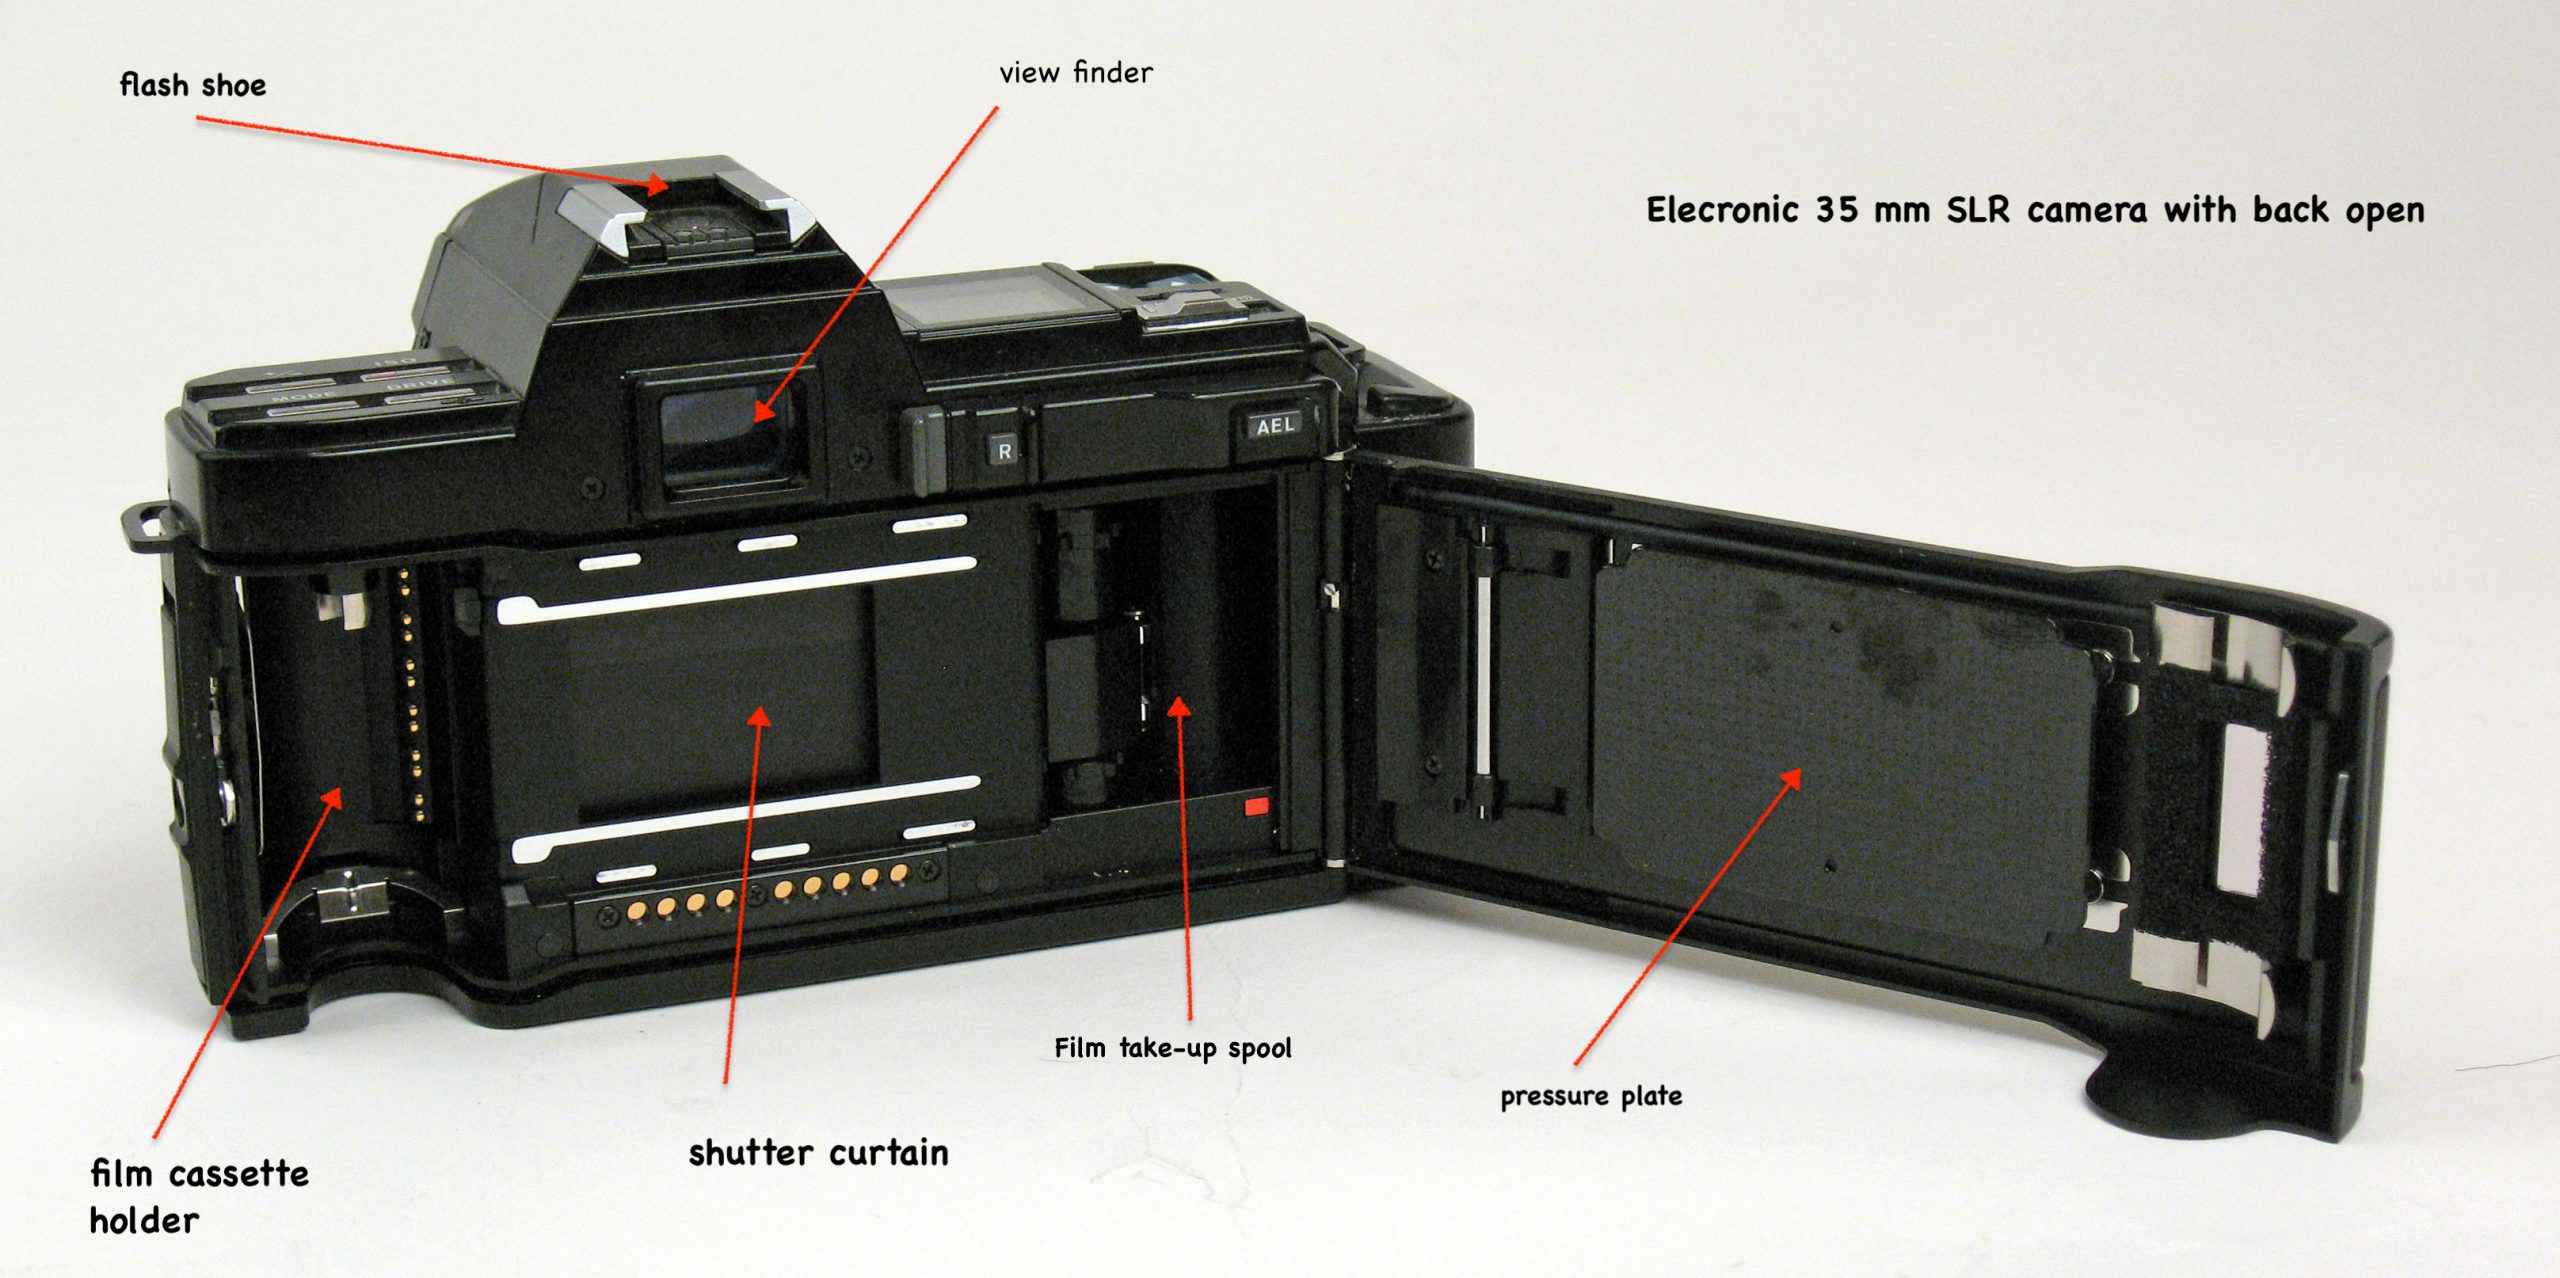
- ✦ Film cartridge chamber
Holds the unexposed 35mm film cartridge.
- ✦ Film gate
Defines the area of film exposed to the image formed by the lens.
- ✦ Pressure plate
Helps hold the film flat as it moves through the camera.
- ✦ Take-up spool
Receives the film as it advances after each exposure.
Why Film Must Stay Flat
Film needs to stay close to the correct film plane when the photograph is taken. If the film moves too far from that position, focus and image quality can suffer.
This is why the pressure plate and film transport system matter. They may seem like small parts, but they play a key role in keeping each frame positioned correctly.
- ✦ Correct film position
Keeps the film aligned with the camera’s image plane.
- ✦ Steady film surface
Helps the image stay consistent across the frame.
The Viewfinder and Focusing System
The viewfinder is the part of a 35mm camera that you look through to compose a photograph. On an SLR camera, the viewfinder uses a mirror and prism system to show the scene through the lens. This lets you see the same lens view used to make the exposure.
Manual cameras often use a focusing screen inside the viewfinder. Some models add a split-image rangefinder, microprism area, or other focusing aid. These tools help you judge when the subject is sharp.

- ✦ Eyepiece
The eyepiece is the small viewing area where you place your eye.
- ✦ Viewfinder screen
Shows the scene and may include focusing or exposure information.
- ✦ Mirror
In an SLR, the mirror reflects light from the lens toward the focusing screen and prism.
- ✦ Pentaprism or pentamirror
This optical system redirects the image so the viewfinder shows an upright view.
- ✦ Focusing screen
Provides a surface where the photographer can judge focus before taking the photograph.
SLR Viewfinder vs. Rangefinder Viewfinder
An SLR viewfinder shows the scene through the taking lens. A rangefinder camera uses a separate viewing system and a different method for focusing. Both can produce excellent photographs, but the way you frame and focus is different.
Understanding this difference helps when learning the parts of a 35mm camera because not every film camera has the same internal design. A compact 35mm camera may also use a simpler viewfinder.
- ✦ SLR
Shows the scene through the taking lens and often uses a mirror and prism.
- ✦ Rangefinder
Uses a separate optical view and a rangefinder focusing system.
- ✦ Point-and-shoot
Usually uses a simple viewfinder and automatic controls.
Film Advance, Rewind, and Transport Controls
The film transport system moves the film from one frame to the next. On many classic manual cameras, you pull the film advance lever after taking a picture. The lever also resets the shutter so the camera is ready for the next exposure.
When the roll is complete, you must rewind the film before opening the camera back. Opening the back too soon can expose the film to light and ruin unprocessed photographs.

- ✦ Film advance lever
Moves the exposed frame away from the film gate and brings the next frame into position.
- ✦ Frame counter
Shows an approximate count of how many frames have been exposed.
- ✦ Rewind release button
Releases the film transport so the film can be rewound into its cartridge.
- ✦ Rewind crank
Turns the film back into the cartridge after the roll is finished.
- ✦ Take-up spool
Pulls the film through the camera as you advance the film.
How to Know When to Rewind the Film
The frame counter can help, but you should not rely on it alone. Most 35mm rolls have a stated frame count, such as 24 or 36 exposures, but the actual number can vary slightly depending on how the film was loaded.
If the advance lever suddenly stops before the expected end of the roll, do not force it. Release the film transport according to the camera instructions and rewind the film before opening the back.
- ✦ Do not force the lever
A sudden stop can mean the film has reached the end of the roll.
- ✦ Release before rewinding
Use the camera’s rewind release control before turning the rewind crank.
Exposure Controls on a 35mm Camera
Exposure controls determine how much light reaches the film. The main controls are aperture and shutter speed, while film speed sets how sensitive the film is to light. On a manual 35mm camera, the photographer balances these settings by hand.
Some cameras include a built-in light meter. The meter reads the scene and gives a guide for choosing an exposure. Older meters may use a needle, LEDs, or another simple display.
- ✦ Aperture
Controls the size of the opening in the lens.
- ✦ Shutter speed
Controls how long the film is exposed to light.
- ✦ Film speed
Describes the film’s light sensitivity, commonly shown as an ISO number.
- ✦ Light meter
Measures light and helps the photographer choose a suitable exposure.
Understanding the Exposure Triangle
The exposure triangle is a simple way to understand the relationship between aperture, shutter speed, and ISO. With film, the ISO is fixed by the film loaded into the camera, so you usually change aperture and shutter speed to control exposure.
For example, if a scene is too dark, you may use a wider aperture or a slower shutter speed. If the scene is too bright, you can use a smaller aperture or faster shutter speed. Each choice also changes the look of the photograph.
- ✦ Aperture effect
Changes light level and depth of field.
- ✦ Shutter effect
Changes light level and the appearance of motion.
- ✦ ISO effect
Film speed affects how much light is needed for an exposure and can affect image grain.
The Camera Body and External Controls
The camera body holds many of the parts of a 35mm camera in one rigid structure. It protects the film chamber, shutter, mirror system, and other internal components. It also provides the controls you use while taking pictures.
The layout changes from one model to another. A professional SLR may have many dials and buttons, while a basic consumer camera may automate most settings. Learning the body layout helps you operate an unfamiliar camera without guessing.

- ✦ Camera body
Provides the main structure that holds and protects the camera’s internal parts.
- ✦ Hot shoe
A metal mount found on many cameras for attaching a compatible flash or accessory.
- ✦ Strap lugs
Small attachment points used to connect a camera strap.
- ✦ Tripod socket
A threaded socket on the bottom of the camera for mounting it on a tripod.
- ✦ Camera back
The rear cover opens on many cameras so you can load and remove film.
Manual vs. Automatic 35mm Cameras
Manual 35mm cameras give you direct control over many settings. This makes them useful for learning how exposure and focus work. Automatic models can make photography easier by choosing some settings for you.
Neither design changes the basic purpose of the main parts of a 35mm camera. The lens still forms the image, the shutter still controls exposure time, and the film still records the photograph.
- ✦ Manual camera
Gives the photographer more direct control over exposure and focus.
- ✦ Automatic camera
Uses built-in electronics or mechanical systems to select some settings.
How All the Parts of a 35mm Camera Work Together
The best way to understand the parts of a 35mm camera is to follow a complete photograph from start to finish. First, you compose the scene through the viewfinder. You focus the lens and choose an aperture and shutter speed, or let the camera choose them if it has automatic exposure.
When you press the shutter release, the shutter opens. Light passes through the lens and aperture and reaches the film. After the exposure, the shutter closes and the film advance system moves the next frame into position.
This process repeats until the roll is finished. You then rewind the exposed film into its cartridge and remove it from the camera. The film can later be processed and scanned or printed.
- ✦ Step 1: Compose
Use the viewfinder to decide what belongs inside the frame.
- ✦ Step 2: Focus
Adjust the lens so the main subject appears sharp.
- ✦ Step 3: Set exposure
Choose aperture and shutter speed based on the scene and the film speed.
- ✦ Step 4: Take the picture
Press the shutter release to expose one frame of film.
- ✦ Step 5: Advance
Move the film to the next frame and reset the shutter.
- ✦ Step 6: Rewind
After the roll is finished, rewind the film into its cartridge before opening the camera.
A Simple Example in Everyday Photography
Imagine taking a photo of a friend at a park on a bright afternoon. You look through the viewfinder, focus on the face, and select an aperture that gives the background a softer look. You then choose a shutter speed that is fast enough to reduce motion blur.
After you press the shutter button, the camera records the image on one frame of film. You advance the film and are ready for the next photograph. This small sequence uses many of the parts of a 35mm camera at the same time.
- ✦ Lens
Forms and focuses the image.
- ✦ Aperture
Controls light and depth of field.
- ✦ Shutter
Controls exposure time.
- ✦ Film
Records the image.
Common Problems With 35mm Camera Parts
Older film cameras can work for decades, but age can affect mechanical and electronic parts. Common problems include sticky shutters, dirty lenses, weak light meters, worn foam seals, and film transport issues. Careful handling can prevent many avoidable problems.
Do not force a control that feels stuck. A small amount of resistance can be normal on some cameras, but a sudden change in feel may signal a mechanical problem. When in doubt, stop and check the camera manual or have the camera inspected by a qualified repair shop.
- ✦ Dirty lens
Dust, fingerprints, and haze can reduce contrast and image quality.
- ✦ Sticky shutter
Old lubricants or worn parts can cause shutter timing problems.
- ✦ Weak light meter
An older meter may give inaccurate readings or stop working.
- ✦ Worn light seals
Old foam seals around the camera back can break down and allow unwanted light leaks.
- ✦ Film transport problems
A worn mechanism can cause the film to advance incorrectly or fail to move.
Basic Care for a 35mm Camera
Keep the camera dry and store it in a clean place. Use a soft cloth for the outside and a proper lens-cleaning method for optical surfaces. Avoid touching the lens glass with bare fingers.
If you store a camera for a long time, remove batteries when the camera design allows it and follow the manufacturer’s storage advice. For valuable or rare cameras, professional servicing can be safer than trying to repair internal parts yourself.
- ✦ Protect the lens
Use a lens cap when the camera is not in use and clean the glass gently.
- ✦ Avoid moisture
Keep the camera away from high humidity and sudden temperature changes when possible.
- ✦ Handle film carefully
Do not open the camera back while unprocessed film is exposed to light.
- ✦ Do not force controls
Stop if a lever, dial, or shutter mechanism behaves differently than normal.
Parts of a 35mm Camera vs. Digital Camera Parts
The basic optical idea behind a film camera and a digital camera is similar. Both use a lens, aperture, shutter, and focusing system to control light and form an image. The biggest difference is what records that light.
A 35mm film camera uses photographic film. A digital camera uses an electronic image sensor. This difference changes how images are stored, reviewed, and processed, but many of the core camera controls remain familiar.
- ✦ Film camera
Uses photographic film to record each exposure.
- ✦ Digital camera
Uses an electronic sensor to record the image as digital data.
- ✦ Film advance
Moves film from one frame to the next in many 35mm cameras.
- ✦ Memory card
Stores digital image files in most modern digital cameras.
- ✦ Processing
Film must be chemically processed before the final image can normally be viewed.
Why Learn Film Camera Parts Today?
Learning the parts of a 35mm camera is useful even if you normally use a digital camera. Film cameras teach the basic relationship between light, aperture, shutter speed, focus, and composition.
Many photographers also enjoy the slower process of film. You cannot instantly check every frame, so you tend to think more carefully before pressing the shutter. That can make film photography a useful way to build strong photography habits.
- ✦ Builds technical skills
Manual controls help you understand the basic mechanics of exposure.
- ✦ Encourages careful shooting
Limited frames can make you slow down and plan each photograph.
- ✦ Teaches photographic fundamentals
The same ideas about light and composition apply to both film and digital photography.
Frequently Asked Questions about parts of a 35mm camera
Recent Posts
Parts of a Camera Canon: A Complete Guide to Canon Camera Parts and Functions
Learn the parts of a Canon camera, what each part does, and how the lens, sensor, shutter, controls, viewfinder, and screen work together.
Learn how scene modes on camera work, when to use Portrait, Landscape, Sports, Night, Macro, and other modes, plus their limits.