
Camera lenses are delicate and expensive pieces of equipment, and any foreign substance like silicone can compromise image quality, focus, and clarity. Silicone can leave a sticky residue or film on the lens surface, making photos blurry or introducing unwanted reflections.
While it may seem tempting to scrape it off quickly, doing so without proper care can scratch the lens or damage the protective coating. In this guide, we’ll explore safe and effective methods to remove silicone from camera lenses, including DIY techniques, recommended cleaning materials, and professional tips.
Whether you’re dealing with accidental spills on DSLR lenses, mirrorless cameras, or compact lenses, following the right steps ensures your camera remains clean, safe, and ready for capturing sharp, high-quality images.
How to Remove Silicone from Camera Lens Safely
Removing silicone from a camera lens requires care, precision, and the right materials, as lenses are delicate and coated to protect against scratches and reflections. Follow these step-by-step instructions to clean your lens safely and effectively:
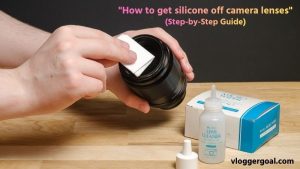
Step 1: Prepare a Clean Workspace
- Find a dust-free, well-lit environment to work in.
- Lay down a soft, clean cloth to place your camera on and prevent accidental scratches.
- Wash your hands to avoid transferring oils or dirt to the lens.
Step 2: Remove Loose Silicone Particles
- Use a lens blower or a soft brush to gently remove any loose silicone debris.
- Avoid blowing too hard to prevent particles from settling inside the lens assembly.
Step 3: Wipe Gently with a Microfiber Cloth
- Take a clean, dry microfiber cloth and gently wipe the affected area in circular motions.
- Start with light pressure; never scrub, as this can scratch the lens or remove coatings.
Step 4: Apply Lens-Safe Cleaning Solution
- For stubborn silicone residue, lightly dampen a microfiber cloth with isopropyl alcohol (IPA) or lens-safe cleaning solution.
- Apply the solution sparingly, avoiding excess liquid that can seep into the lens.
- Gently rub the silicone spot in small circular motions until it lifts.
Step 5: Avoid Sharp or Abrasive Tools
- Never use knives, scrapers, or household abrasives, as these can permanently damage the lens glass or coatings.
- Stick to soft cloths, lens tissues, and approved cleaning solutions.
Step 6: Dry and Inspect the Lens
- Use a dry microfiber cloth to remove any remaining moisture or streaks.
- Inspect the lens under good light to ensure all silicone has been removed.
- Repeat the cleaning with a fresh cloth if necessary, but always use gentle motions.
Step 7: Consider Professional Help for Heavy Buildup
- If silicone is thick or stubborn, or if it has seeped into crevices, consult a professional camera technician or manufacturer service center.
- Attempting aggressive cleaning yourself can void warranties or permanently damage the lens.
Extra Tips for Lens Safety:
- Always use lens-safe products; household solvents like acetone or nail polish remover are dangerous.
- Work slowly and carefully; patience is key to avoiding scratches.
- Keep extra microfiber cloths and lens blowers handy for multiple cleaning attempts.
How to Get Silicone Off Camera Lenses (Nikon)
Accidental silicone spills or residue on Nikon camera lenses can affect image quality and clarity, making it essential to clean carefully. Nikon lenses are delicate, often with special coatings, so following the right steps ensures you remove silicone safely without damaging your lens.
Step 1: Prepare Your Workspace
- Work in a clean, dust-free environment to prevent debris from scratching the lens.
- Place your Nikon camera on a soft cloth or pad to protect it from accidental bumps.
- Wash or sanitize your hands before handling the lens to avoid transferring oils.
Step 2: Remove Loose Silicone Particles
- Use a lens blower or a soft-bristled brush to remove loose silicone bits.
- Be gentle to prevent particles from entering the lens assembly or causing scratches.
Step 3: Wipe Gently with a Microfiber Cloth
- Take a clean microfiber cloth and wipe the lens surface in circular motions.
- Apply only light pressure, as Nikon lenses have sensitive coatings that can be scratched easily.
Step 4: Use Lens-Safe Cleaning Solution
- For stubborn silicone, lightly dampen a microfiber cloth with isopropyl alcohol (IPA) or a Nikon-approved lens cleaning solution.
- Avoid pouring or spraying liquid directly onto the lens; always apply it to the cloth first.
- Gently rub the affected area in small circular motions until the silicone is removed.
Step 5: Avoid Sharp or Abrasive Tools
- Never use knives, scrapers, or household chemicals like acetone or nail polish remover.
- Only use soft cloths, lens tissues, and manufacturer-approved cleaning solutions to prevent permanent damage.
Step 6: Dry and Inspect the Lens
- Use a dry microfiber cloth to remove any remaining moisture or streaks.
- Inspect the lens under bright light to ensure all silicone residue is gone.
- Repeat the cleaning gently if any residue remains.
Step 7: Seek Professional Help if Needed
- If silicone has seeped into lens crevices or the coating appears damaged, consult a Nikon service center or professional technician.
- Attempting aggressive cleaning yourself can void warranties or permanently damage the lens.
Pro Tips for Nikon Lens Safety:
- Always use Nikon-approved lens cleaning products.
- Work slowly and patiently; rushing increases the risk of scratches.
- Keep extra microfiber cloths and a blower handy for repeated cleaning attempts.
Store lenses in a dust-free case to prevent accidental contamination in the future.
Best Way to Clean Silicone Off DSLR Lens
Silicone residue on a DSLR lens can affect image clarity, focus, and overall photo quality, so it’s important to remove it carefully without damaging the lens glass or coatings. Here’s the safest and most effective method to clean silicone off your DSLR lens:
Step 1: Set Up a Clean Workspace
- Work in a dust-free, well-lit area to prevent debris from scratching the lens.
- Place your DSLR on a soft, clean cloth or pad to protect it from accidental bumps.
- Wash your hands to remove oils or dirt before touching the lens.
Step 2: Remove Loose Silicone Particles
- Use a lens blower or a soft-bristled brush to gently remove any loose silicone pieces.
- Avoid blowing too hard to prevent particles from entering the lens assembly.
Step 3: Wipe Gently with a Microfiber Cloth
- Take a clean microfiber cloth and gently wipe the lens surface in small circular motions.
- Apply light pressure only; scrubbing can scratch the lens or damage anti-reflective coatings.
Step 4: Apply a Lens-Safe Cleaning Solution
- For stubborn silicone residue, lightly dampen a microfiber cloth with isopropyl alcohol (IPA) or a DSLR-safe lens cleaning solution.
- Never pour or spray liquid directly onto the lens; always apply it to the cloth first.
- Gently rub the affected area in circular motions until the silicone lifts.
Step 5: Avoid Sharp or Abrasive Tools
- Do not use knives, scrapers, or household chemicals like acetone or nail polish remover.
- Stick to lens-safe materials to protect the glass and coating.
Step 6: Dry and Inspect the Lens
- Use a dry microfiber cloth to remove any remaining moisture or streaks.
- Inspect the lens under good light to ensure all silicone residue is gone.
- Repeat the cleaning gently if necessary, using a fresh cloth to avoid redistributing silicone.
Step 7: Consider Professional Help for Stubborn Cases
- If silicone has hardened, seeped into edges, or the lens coating seems compromised, consult a professional camera technician.
- Attempting aggressive cleaning yourself may permanently damage your DSLR lens.
Extra Tips for DSLR Lenses Safety:
- Always use lens-safe cleaning products; avoid harsh household chemicals.
- Perform cleaning slowly and patiently to prevent scratches.
- Keep a blower, extra microfiber cloths, and lens tissues handy for repeated cleaning.
- Store your DSLR lens in a dust-free case to prevent future silicone contamination.
Removing Silicone Residue from Camera Lens
Silicone residue on a camera lens can compromise image quality, clarity, and focus, so it’s important to clean it carefully without damaging the lens glass or coatings. Follow these step-by-step instructions to safely and effectively remove silicone residue:
Step 1: Prepare a Clean Workspace
- Work in a dust-free, well-lit area to prevent debris from scratching the lens.
- Place your camera on a soft, clean cloth to protect it from accidental bumps.
- Wash your hands to remove oils or dirt before handling the lens.
Step 2: Remove Loose Silicone Particles
- Use a lens blower or a soft-bristled brush to gently remove loose silicone bits.
- Be gentle to avoid pushing debris into the lens assembly or causing scratches.
Step 3: Wipe Gently with a Microfiber Cloth
- Take a clean microfiber cloth and wipe the lens in small, circular motions.
- Apply light pressure only; never scrub harshly, as this can damage coatings or scratch the glass.
Step 4: Apply Lens-Safe Cleaning Solution
- For stubborn silicone residue, lightly dampen a microfiber cloth with isopropyl alcohol (IPA) or a lens-safe cleaning solution.
- Do not pour or spray liquid directly onto the lens; always apply it to the cloth first.
- Gently rub the affected area in circular motions until the silicone lifts.
Step 5: Avoid Abrasive or Sharp Tools
- Never use knives, scrapers, or household chemicals like acetone or nail polish remover.
- Only use lens-safe materials to protect the glass and any coatings.
Step 6: Dry and Inspect the Lens
- Use a dry microfiber cloth to remove any moisture or streaks.
- Inspect the lens under good lighting to ensure all silicone residue has been removed.
- Repeat cleaning gently if necessary, using a fresh cloth.
Step 7: Seek Professional Help if Needed
- If silicone is thick, hardened, or has seeped into crevices, consult a professional camera technician or manufacturer service center.
- Aggressive DIY cleaning in such cases may damage your lens permanently.
How to Remove Sticky Silicone from Camera Optics
Sticky silicone on camera optics can significantly affect image quality, focus, and clarity. Removing it requires care to avoid scratching the glass or damaging lens coatings. Follow these step-by-step instructions for safe and effective cleaning:
Step 1: Prepare a Clean and Safe Workspace
- Work in a dust-free, well-lit area.
- Place your camera on a soft, clean cloth to prevent accidental scratches or damage.
- Wash your hands to remove oils or dirt before handling the optics.
Step 2: Remove Loose Silicone Particles
- Use a lens blower or soft-bristled brush to gently remove loose silicone bits.
- Avoid pushing particles into the lens assembly, which can cause internal damage.
Step 3: Use a Microfiber Cloth for Gentle Wiping
- Take a clean microfiber cloth and gently wipe the sticky area in circular motions.
- Apply light pressure, never scrub harshly, as this can scratch the optics or remove coatings.
Step 4: Apply Lens-Safe Cleaning Solution
- For stubborn sticky silicone, lightly dampen a microfiber cloth with isopropyl alcohol (IPA) or a lens-safe cleaning solution.
- Do not pour or spray liquid directly onto the lens; always apply it to the cloth first.
- Gently rub the affected area in small circular motions until the silicone lifts.
Step 5: Avoid Sharp or Abrasive Tools
- Never use knives, scrapers, or household solvents like acetone or nail polish remover.
- Stick to lens-safe materials to prevent permanent damage to the optics.
Step 6: Dry and Inspect the Optics
- Use a dry microfiber cloth to remove remaining moisture or streaks.
- Inspect under bright light to ensure all silicone residue is gone.
- Repeat the cleaning gently if needed, using a fresh cloth each time.
Step 7: Consider Professional Help for Severe Residue
- If silicone is thick, hardened, or has seeped into lens edges, consult a professional camera technician.
- Attempting aggressive DIY cleaning in such cases may permanently damage your camera optics.
DIY Methods for Silicone Removal from Camera Lens
Removing silicone from a camera lens at home can be done safely if you use the right tools and gentle techniques. Since camera lenses have delicate coatings and precision glass, it’s important to follow DIY methods that remove silicone effectively without causing scratches or damage. Below are some reliable and safe DIY methods you can use.
- Using a Microfiber Cloth
A clean, soft microfiber cloth is the first and safest tool for removing silicone residue. Gently wipe the lens in small circular motions to lift off loose or sticky silicone. This method is ideal for light contamination and prevents scratches, making it a reliable first step before using any cleaning solution.
- Lens Blower for Loose Particles
A lens blower can help remove small silicone particles that may have settled on the surface. By gently blowing air, you can prevent abrasive rubbing with the cloth, which could otherwise scratch delicate lens coatings. This method is especially useful before wiping the lens with any solution.
- Isopropyl Alcohol (IPA) or Lens-Safe Solution
For stubborn or sticky silicone, lightly dampen a microfiber cloth with isopropyl alcohol (IPA) or a camera lens-safe cleaning solution. Apply it sparingly to the cloth (never directly on the lens) and wipe gently in circular motions. This effectively dissolves silicone residues while preserving lens coatings.
- Using Lens Tissues or Soft Cotton Swabs
For edges and crevices of the lens where silicone can accumulate, use lens tissues or soft cotton swabs lightly dampened with a lens-safe solution. Carefully swab these areas to remove residue without forcing liquid into the lens assembly, ensuring safe and thorough cleaning.
- Avoiding Household Chemicals or Sharp Tools
DIY cleaning should never involve knives, scrapers, or harsh household chemicals like acetone or nail polish remover. These can permanently damage the lens glass or remove protective coatings. Sticking to microfiber cloths, lens tissues, and approved cleaning solutions ensures safety while effectively removing silicone.
- Drying and Inspecting
After cleaning, use a dry microfiber cloth to remove any moisture or streaks. Inspect the lens under good light to confirm all silicone residue has been removed. Repeat gently if necessary, ensuring the lens remains scratch-free and fully functional.
Always perform DIY cleaning in a dust-free area and work slowly and patiently, as rushing can lead to scratches or coating damage. Keeping extra microfiber cloths, lens tissues, and a blower on hand makes the process smoother and safer.
Using Alcohol or Solvents to Remove Silicone from Lenses
When dealing with stubborn silicone residue on camera lenses, using isopropyl alcohol (IPA) or lens-safe solvents can be an effective solution. These substances help break down sticky silicone without harming the lens coating, provided they are used carefully.
Start by applying a small amount of alcohol or solvent to a clean microfiber cloth; never pour it directly onto the lens, as excessive moisture can seep into the lens assembly and cause permanent damage.
Gently wipe the affected area in small circular motions, allowing the solvent to dissolve the silicone gradually. Avoid pressing too hard or scrubbing aggressively, as this can scratch the lens surface or remove protective coatings. For edges or tight spaces, lightly dampened cotton swabs or lens tissues can be used to reach silicone residue in crevices.
After the silicone has been lifted, use a dry microfiber cloth to remove any remaining solvent or moisture and inspect the lens under good lighting. This careful approach ensures that the lens remains clean, scratch-free, and fully functional, maintaining the clarity and optical performance that is critical for high-quality photography.
Safety Tips:
- Always use lens-safe alcohol or solvents; household chemicals like acetone or nail polish remover are too harsh and can permanently damage the lens.
- Work in a dust-free area to avoid particles scratching the lens.
- Apply solvents sparingly to prevent liquid from seeping inside the lens.
- Keep extra microfiber cloths, lens tissues, and a blower handy for thorough cleaning.
How to Get Silicone Off Camera Lenses Without Damage
Silicone residue on a camera lens can reduce image clarity and interfere with proper focusing, but removing it requires careful handling to avoid scratching the glass or damaging delicate coatings.
The key to safe cleaning is using gentle techniques and lens-safe materials so the silicone can be removed without harming the optical surface. Below are the most effective and safe methods for getting silicone off camera lenses without causing damage.
Start with a Dust-Free Workspace: Before attempting any cleaning, set up a clean, well-lit, and dust-free area. Placing your camera on a soft cloth or pad prevents accidental scratches. Handling the lens in a controlled environment reduces the risk of adding dirt or debris that could damage the glass during cleaning.
Use a Soft Microfiber Cloth: A clean microfiber cloth is your first tool for removing silicone. Gently wipe the lens surface in circular motions, applying light pressure only. This method removes loose silicone without scratching the lens or harming delicate coatings. Avoid paper towels or rough fabrics, which can leave micro-scratches.
Employ a Lens Blower for Loose Particles: Use a lens blower or soft brush to remove tiny silicone particles. Blowing air gently keeps debris off the lens while preventing the need for excessive wiping, which could scratch the surface. This step is crucial for preparing the lens for deeper cleaning.
Use Lens-Safe Cleaning Solutions Carefully: For sticky or stubborn silicone residue, lightly dampen a microfiber cloth with isopropyl alcohol (IPA) or a lens-safe cleaning solution. Never pour liquid directly on the lens, as excess moisture can seep into the internal assembly. Gently rub the affected areas in small circular motions until the silicone lifts without applying harsh pressure.
Target Crevices with Lens Tissues or Cotton Swabs: For silicone that collects around lens edges or tight spaces, use lens tissues or soft cotton swabs lightly dampened with a cleaning solution. Carefully swab these areas without forcing liquid inside the lens, ensuring a thorough yet safe cleaning.
Dry and Inspect the Lens: Once the silicone is removed, dry the lens using a fresh microfiber cloth. Inspect the surface under bright light to confirm no residue or streaks remain. Repeat the cleaning process gently if needed, always using soft, lens-safe materials.
Avoid Sharp or Abrasive Tools: Never use knives, scrapers, or household solvents like acetone or nail polish remover. These can permanently damage the lens coatings or glass. Sticking to approved lens-safe materials ensures the silicone is removed without compromising optical quality.
Tips to Get Silicone Off Lens Without Scratching
Removing silicone from a camera lens requires careful handling to avoid scratching the delicate glass or damaging protective coatings.
Use a Clean Microfiber Cloth
A soft, clean microfiber cloth is essential for removing silicone safely. Gently wipe the lens in small circular motions, applying light pressure only. This method prevents scratches and protects delicate lens coatings while lifting loose or sticky silicone. Avoid using paper towels or rough fabrics, which can leave micro-scratches on the lens surface.
Remove Loose Particles with a Lens Blower
Before wiping, use a lens blower or soft brush to remove any loose silicone particles. This prevents debris from grinding against the lens during cleaning, which could cause scratches or damage coatings. Blowing air gently is a safe, non-contact way to prepare the lens for deeper cleaning.
Dampen the Cloth with Lens-Safe Solution
For stubborn or sticky silicone, lightly dampen a microfiber cloth with isopropyl alcohol (IPA) or a lens-safe cleaning solution. Always apply the liquid to the cloth, not directly on the lens, to avoid moisture seeping into the lens assembly. Gently wipe the silicone residue in small circular motions to dissolve it without applying harsh pressure.
Use Cotton Swabs for Edges and Crevices
Silicone often accumulates in lens edges, threads, or crevices. Use a soft cotton swab lightly dampened with lens-safe solution to carefully clean these areas. This ensures thorough cleaning without scratching the flat lens surface.
Dry and Inspect Carefully
After cleaning, use a dry microfiber cloth to remove any remaining moisture or streaks. Inspect the lens under good lighting to ensure all silicone residue is gone. Repeat the process gently if needed, always using soft, lens-safe materials.
Avoid Sharp or Abrasive Tools
Never use knives, scrapers, or household chemicals like acetone or nail polish remover. These can permanently damage lens coatings or scratch the glass. Stick to approved lens-safe materials to safely remove silicone.
For tight edges and crevices, carefully use soft cotton swabs or lens tissues dampened with cleaning solution. Always dry the lens with a clean microfiber cloth and inspect under good lighting to ensure all residue is gone. Patience and gentle handling are key: rushing or using sharp objects can permanently damage the lens.
FAQs
Can silicone damage my camera lens?
Yes, silicone residue can reduce image clarity and may affect lens coatings if not removed carefully. Using proper cleaning methods ensures your lens remains safe.
What is the safest way to remove silicone from a lens?
The safest method is to use a microfiber cloth with gentle circular motions, optionally lightly dampened with lens-safe cleaning solution or isopropyl alcohol. Avoid sharp tools or harsh chemicals.
Can I use household chemicals to remove silicone?
No. Household chemicals like acetone, nail polish remover, or strong solvents can permanently damage lens coatings. Always use lens-safe products.
Should I use water to clean silicone off my lens?
Plain water is usually not effective for sticky silicone and can seep into the lens. Use a lens-safe solution or isopropyl alcohol applied to a microfiber cloth instead.
How do I remove silicone from lens edges or crevices?
Use soft cotton swabs or lens tissues lightly dampened with lens-safe solution to clean edges and crevices gently, avoiding excess liquid.
What should I do if silicone has hardened on the lens?
If silicone is hardened or stuck in hard-to-reach areas, it’s best to consult a professional camera technician rather than risk DIY cleaning that may damage the lens.
How often should I clean my lens after silicone exposure?
Clean the lens immediately after silicone exposure to prevent it from drying and sticking. Regular maintenance and dust-free storage also help prevent future contamination.
Conclusion
Removing silicone from camera lenses requires care, patience, and the right tools to avoid damaging the delicate glass or coatings. By following proper methods, such as using soft microfiber cloths, lens-safe cleaning solutions, and gentle circular motions, you can effectively eliminate silicone residue while maintaining your lens’s clarity, sharpness, and optical performance.
For tricky areas like edges or crevices, cotton swabs or lens tissues can help, and stubborn silicone may sometimes require professional cleaning. Avoid harsh chemicals, scrapers, or excessive pressure, as these can permanently harm your lens.
Regular maintenance, careful handling, and prompt cleaning after silicone exposure will prolong the life of your camera lenses and ensure they continue to deliver high-quality images. By combining safe DIY techniques with proper storage and cleaning habits, photographers can keep their lenses silicone-free and performing at their best.
Recent Posts
In today’s content-driven world, having a reliable video camera is essential for creators, vloggers, and everyday users who want to capture high-quality footage without complicated setups. The CS-8...
When it comes to mirrorless and compact cameras, Fujifilm has consistently been at the forefront of innovation, blending exceptional image quality with stylish design and intuitive...