
Modern cameras can make many choices for you. This helps when you need to take a photo fast. Scene modes on camera are designed for this exact job. They let you tell the camera what kind of scene you are shooting, and the camera then selects settings that fit that scene.
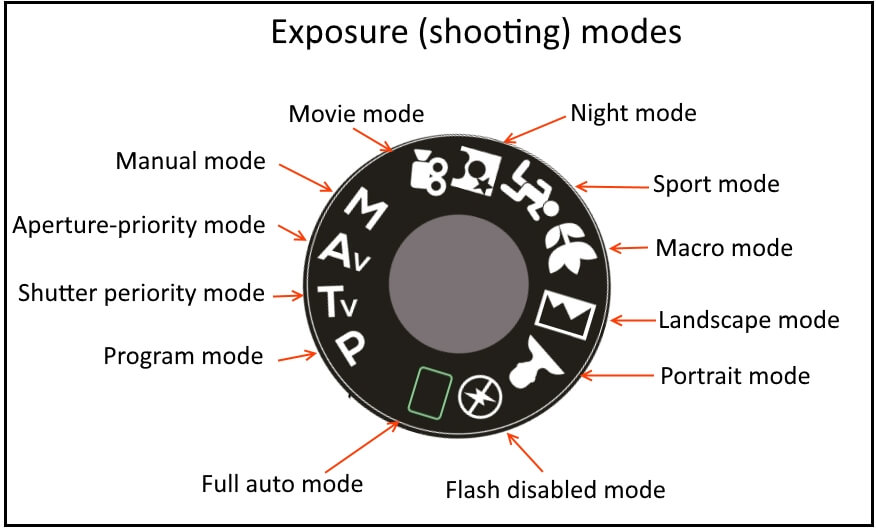
You may see icons for a person, mountain, running figure, flower, moon, or sunset on your camera. These icons often represent different scene modes. The names and choices vary by brand and model, but the basic idea stays the same.
Scene modes are especially useful for beginners, family photos, travel, school events, vacations, and quick snapshots. They can also help you learn because they show how a camera reacts to different types of subjects and light.

What Are Scene Modes on Camera?
Scene modes on camera are preset programs made for common photo situations. Instead of setting each camera control by hand, you choose a scene that matches what you see. The camera then changes one or more settings to suit that scene.
For example, Sports mode may use a faster shutter speed to help reduce motion blur. Portrait mode may choose a wider aperture when the lens allows it. Landscape mode may favor settings that keep more of the scene sharp.
The exact behavior depends on the camera. A compact camera may change many settings at once. A DSLR or mirrorless camera may give the scene mode control over exposure, focus, color, flash, and other features.
- ✦ Preset choices
The camera uses a set of rules made for a particular type of scene.
- ✦ Fast setup
You can choose a useful starting point without changing several settings by hand.
- ✦ Beginner friendly
Scene modes reduce the number of technical choices you need to make before taking a photo.
- ✦ Camera dependent
Different brands and models may use different scene modes and apply them in different ways.
How Do Scene Modes Work?
When you select a scene mode, the camera uses a preset recipe. That recipe can affect exposure, focus, ISO, white balance, flash, image processing, and other controls. The camera measures the scene and then applies the chosen recipe.
This does not mean the camera always uses one fixed setting. Many cameras still adjust their choices as the light and subject change. Scene mode is better understood as a group of instructions than as one fixed exposure value.
- ✦ Measure
The camera checks the light and subject before taking the photo.
- ✦ Choose
The selected scene tells the camera what kind of result you want.
- ✦ Adjust
The camera changes suitable settings within the limits of the selected mode.
Common Scene Modes on Camera
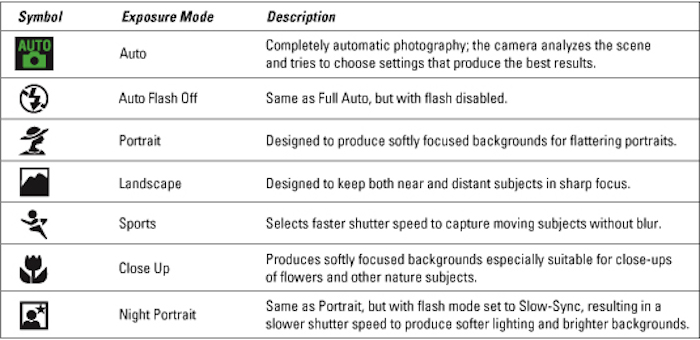
Most cameras do not have the same list of scene modes. Still, several choices appear again and again. Learning what these modes try to do makes it easier to pick the right one.
The goal is not to memorize every icon. Instead, look at the subject, the light, and the motion in the scene. Then choose the mode that matches the main problem you need the camera to solve.
- ✦ Portrait
Portrait mode is designed for people. It often tries to keep the subject clear while creating a softer background.
- ✦ Landscape
Landscape mode is made for wide scenes such as parks, mountains, buildings, and city views. It often favors greater depth of field and strong detail.
- ✦ Sports
Sports mode is designed for moving subjects. It commonly favors a faster shutter speed to reduce blur.
- ✦ Macro
Macro mode is intended for close subjects such as flowers, small objects, and insects. It helps the camera choose settings suited to close focusing.
- ✦ Night
Night mode is made for dark scenes. It may use a slower shutter speed, higher ISO, flash, or a combination of techniques.
- ✦ Night Portrait
Night Portrait mode is designed for people in dark settings. It may combine flash with a longer exposure so the person and background both receive some light.
- ✦ Sunset
Sunset mode is designed to preserve the warm look of a sunset. The camera may adjust color and exposure to keep the scene visually rich.
- ✦ Snow or Beach
These modes are made for bright scenes that can confuse normal exposure. They may help prevent the camera from making snow or sand look too gray.
Portrait Scene Mode
Portrait mode is one of the most useful scene modes on camera for casual people photos. It may use a wider aperture when possible and can also change skin tones, focus behavior, or flash settings.
Keep in mind that a scene mode cannot create background blur beyond what the lens and camera can physically produce. Distance, focal length, sensor size, and aperture all affect the final look.
- ✦ Best use
Use it for family photos, casual portraits, and quick people
shots. - ✦ Watch for
Check the eyes and face after taking the
photo, especially in low light.
Sports Scene Mode
Sports mode is useful when your subject moves quickly. A faster shutter speed can help freeze action, which is useful for children playing, school sports, pets, and outdoor events.
A faster shutter speed may require more light or a higher ISO. In very dark places, the camera may still produce some motion blur.
- ✦ Best use
Use it for runners, cyclists, players, children, pets, and other moving subjects.
- ✦ Main goal
The main goal is usually to reduce blur caused by subject movement.
When Should You Use Scene Modes on Camera?
Scene modes on camera work best when you want to focus on the moment rather than camera controls. They are helpful when you are still learning exposure or when you need to take a photo quickly.
For example, imagine you are visiting a national park in the United States. You see a great mountain view and have only a few seconds before the light changes. Landscape mode can give you a useful starting point without making you adjust several controls.
The same idea works at a family birthday party. Portrait mode can be a simple choice when people are the main subject. At a child’s soccer game, Sports mode may save time and help you deal with fast action.

- ✦ Travel
Scene modes can help when you move between bright outdoor views, indoor spaces, and evening scenes.
- ✦ Family events
Portrait and Sports modes can help with people who move or change position quickly.
- ✦ Low light
Night and Night Portrait modes can provide a simple starting point when light is limited.
- ✦ Learning photography
Scene modes can help beginners see how different situations lead to different camera choices.
- ✦ Fast snapshots
They reduce the time needed to set up the camera before a photo is taken.
A Simple Way to Choose a Scene Mode
Start by asking one question: what is the main subject or problem in this photo? If the subject is a person, try Portrait. If it is moving fast, try Sports. If the scene is wide and still, try Landscape.
Then check the light. If the scene is very dark, consider Night or Night Portrait. If you are close to a small object, try Macro. This simple process keeps scene mode selection quick and clear.
- ✦ Look at the subject
Decide whether you are mainly photographing a person, landscape, action, close object, or night scene.
- ✦ Check the light
Notice whether the scene is bright, dark, backlit, or mixed.
- ✦ Take a test photo
Review the result and change modes if the photo does not match the scene.
Scene Modes vs Auto, Aperture Priority, Shutter Priority, and Manual
Scene modes on camera are not the same as regular Auto, Aperture Priority, Shutter Priority, or Manual mode. Each one gives you a different level of control. The best choice depends on how much control you want and how quickly you need to work.
Auto mode usually lets the camera make broad decisions without asking you to identify the scene. Scene mode gives the camera more information by telling it what type of photo you want. The other modes give you more direct control over specific settings.
As your photography skills grow, you may find that Aperture Priority or Shutter Priority gives you more control while still keeping the camera involved. Manual mode gives you the most direct control over exposure, but it also requires more knowledge and attention.

- ✦ Scene Mode
You choose the type of scene, and the camera applies a preset strategy.
- ✦ Auto Mode
The camera makes most major decisions without requiring you to select a specific scene.
- ✦ Aperture Priority
You choose the aperture, while the camera normally chooses a shutter speed for the exposure.
- ✦ Shutter Priority
You choose the shutter speed, while the camera normally chooses an aperture.
- ✦ Manual Mode
You choose the main exposure settings yourself, including shutter speed and aperture.
Why Beginners Often Start With Scene Modes
Photography has many controls. Learning them all at once can feel hard. Scene modes reduce the number of decisions you need to make, so you can spend more time thinking about composition, timing, and light.
They are also useful as a bridge to manual control. After using Sports mode, for example, you may notice that the camera needs a fast shutter speed for action. That experience can make Shutter Priority easier to understand later.
- ✦ Less setup
You can get ready to shoot with fewer technical decisions.
- ✦ Useful feedback
The results can help you understand how exposure and focus change in different situations.
When to Move Beyond Scene Modes
You may want more control when the camera’s preset choices do not match your creative goal. This often happens when you want a specific depth of field, exact motion blur, consistent exposure across a series, or a particular look.
At that point, Aperture Priority, Shutter Priority, or Manual mode can give you more control. You do not need to stop using scene modes completely. Use the mode that fits the job.
- ✦ Creative control
Choose a more advanced mode when you need to control depth of field or motion blur.
- ✦ Consistent results
Manual or semi-manual modes can help keep settings stable across a set of photos.
Benefits and Limitations of Scene Modes on Camera
Scene modes on camera can be very useful, but they are not magic settings. They work from general assumptions about a scene. Real photos can be more complex than those assumptions.
A Portrait mode may work well outdoors but struggle in a dark room. Sports mode may help with motion but increase ISO when there is not enough light. Understanding these limits helps you use scene modes with better judgment.

- ✦ Benefit: speed
You can choose a suitable setup in seconds.
- ✦ Benefit: simplicity
You do not need to understand every exposure control before taking a useful photo.
- ✦ Benefit: learning tool
Scene modes can show how different subjects lead to different camera settings.
- ✦ Limit: preset assumptions
The camera cannot always understand your creative goal or the unusual parts of a scene.
- ✦ Limit: less control
You may not be able to choose the exact aperture, shutter speed, or other settings you want.
- ✦ Limit: model differences
A scene mode on one camera may behave differently from a similarly named mode on another camera.
Common Problems With Scene Modes
One common issue is motion blur. If the scene is dark, the camera may not be able to use a fast enough shutter speed. A Sports scene mode can help, but it cannot create light that is not there.
Another issue is focus. A scene mode may choose a useful autofocus strategy, but the camera can still focus on the wrong part of a busy frame. Always check your subject when focus matters.
- ✦ Too much blur
Low light or fast movement can still cause blur even when you select a suitable scene.
- ✦ Wrong focus
Busy backgrounds can make autofocus choose an unwanted subject.
- ✦ Unexpected brightness
Very bright or very dark scenes can confuse exposure systems.
How to Get Better Results
Use scene modes as a starting point rather than a guarantee. Watch the light, keep the subject in a useful position, and take more than one frame when the moment matters.
If your camera lets you change exposure compensation or another control while using a scene mode, learn what that control does. A small adjustment can sometimes solve a problem without forcing you into full Manual mode.
- ✦ Watch the background
A clean background can make portraits and other subjects easier to read.
- ✦ Check the result
Use your camera screen to look for blur, poor focus, or lost detail.
- ✦ Use better light
Good light often improves a photo more than changing camera modes.
How to Use Scene Modes on Different Types of Cameras
Scene modes can appear on compact cameras, bridge cameras, DSLRs, mirrorless cameras, and some smartphones. The controls may look different, but the main idea is similar: choose a situation and let the camera apply a suitable group of settings.
On a DSLR or mirrorless camera, scene modes may appear on a mode dial or inside a menu. On a compact camera, they may be grouped under a Scene or SCN option. Your camera manual is the best place to confirm exactly what each icon does.
Do not assume that every camera uses the same icon or name. One brand may call a mode Night Portrait, while another may use a different label for a similar function.

- ✦ Compact cameras
Scene modes are often easy to access through a dedicated Scene or SCN setting.
- ✦ DSLR cameras
Some entry-level models include scene settings through a mode dial or menu.
- ✦ Mirrorless cameras
Scene options may appear on the mode dial, quick menu, or main camera menu.
- ✦ Smartphones
Phones often use automatic scene recognition instead of giving the user a traditional scene-mode menu.
How to Find Scene Modes on Your Camera
Look for a mode dial marked SCN, Scene, or an icon that represents several shooting situations. If you do not see one, open the camera’s shooting menu and look for Scene Selection or a similar term.
If your camera does not offer scene modes, that is normal. Many newer cameras use advanced Auto, subject detection, or specialized autofocus systems instead. You can still get similar help without a traditional Scene menu.
- ✦ Check the mode dial
Look for SCN, Scene, or scene icons.
- ✦ Check the shooting menu
Search for Scene Selection or a similar setting.
- ✦ Read the manual
Camera manuals explain the exact behavior of each scene option on your model.
Practical Tips for Getting the Most From Scene Modes
The best way to learn scene modes on camera is to test them. Pick one subject and take several photos with different modes. Then compare the results and note what changed.
You can do this at home with a simple object, during a family event, or outside on a walk. Try Portrait, Auto, and another suitable mode on the same subject. This makes the differences easier to see.
Do not worry if your camera does not behave exactly like another camera. Scene modes are built around each camera’s hardware and software. What matters is whether the mode helps you make the photo you want.

- ✦ Compare modes
Photograph the same subject in Auto and a suitable scene mode to see what changes.
- ✦ Study the light
Notice how bright, dim, front-lit, and backlit scenes affect the camera’s choices.
- ✦ Watch shutter speed
Slow shutter speeds can cause blur when you or your subject moves.
- ✦ Watch ISO
Higher ISO can help in low light but may add visible image noise.
- ✦ Check focus
Zoom in on important subjects to make sure the camera focused where you expected.
- ✦ Learn one advanced mode
After you understand scene modes, try Aperture Priority or Shutter Priority to gain more control.
A Simple Practice Exercise
Place a small object near a window. Take one photo in Auto mode, one in Portrait mode, and one in another mode that fits the subject. Keep the camera in the same place for each shot.
Compare brightness, background blur, focus, color, and noise. You may begin to see the choices the camera makes for each scene. This is a simple way to turn scene modes into a photography learning tool.
- ✦ Step 1
Choose one still subject and keep the camera position fixed.
- ✦ Step 2
Take photos with Auto and two suitable scene modes.
- ✦ Step 3
Compare the images and identify which camera choices changed.
- ✦ Step 4
Repeat the exercise with a moving subject and in lower light.
Do Professionals Use Scene Modes?
Professional photographers often use more direct controls because their work may require consistent exposure, precise depth of field, or exact motion control. That does not make scene modes useless.
A photographer’s goal is to make the intended image. If a scene mode solves the problem quickly, there is no rule that says it cannot be used. The right camera mode is the one that gives you the control and result you need.
- ✦ Control matters
Advanced modes are useful when exact settings are important.
- ✦ Speed matters too
Scene modes can still be useful when quick setup matters more than fine control.
Frequently Asked Questions about scene modes on camera
Recent Posts
Manual Mode on Camera: A Simple Guide to Taking Full Control of Your Photos
Learn manual mode on camera step by step. Master aperture, shutter speed, ISO, exposure, focus, and camera settings with simple tips.
Advantages of DSLR Camera: 10 Key Benefits for Photographers
Discover the advantages of DSLR cameras, from image quality and lens choice to manual control, battery life, speed, and low-light performance.