
Manual mode on camera can look hard at first. The camera shows many numbers, symbols, and dials. Yet the core idea is simple: you decide how much light enters the camera, how long it stays there, and how sensitive the sensor is.
I find that beginners learn manual mode faster when they stop trying to memorize every camera setting. Instead, learn what each main control does and watch how your photo changes. A few short practice sessions can make the process feel much more natural.
Manual mode is especially useful when you want the same look across a group of photos. This can help during a portrait session, a product shoot, a food shoot, or a landscape session. It also gives you more control when your camera’s automatic modes keep changing the exposure.
What Is Manual Mode on Camera?
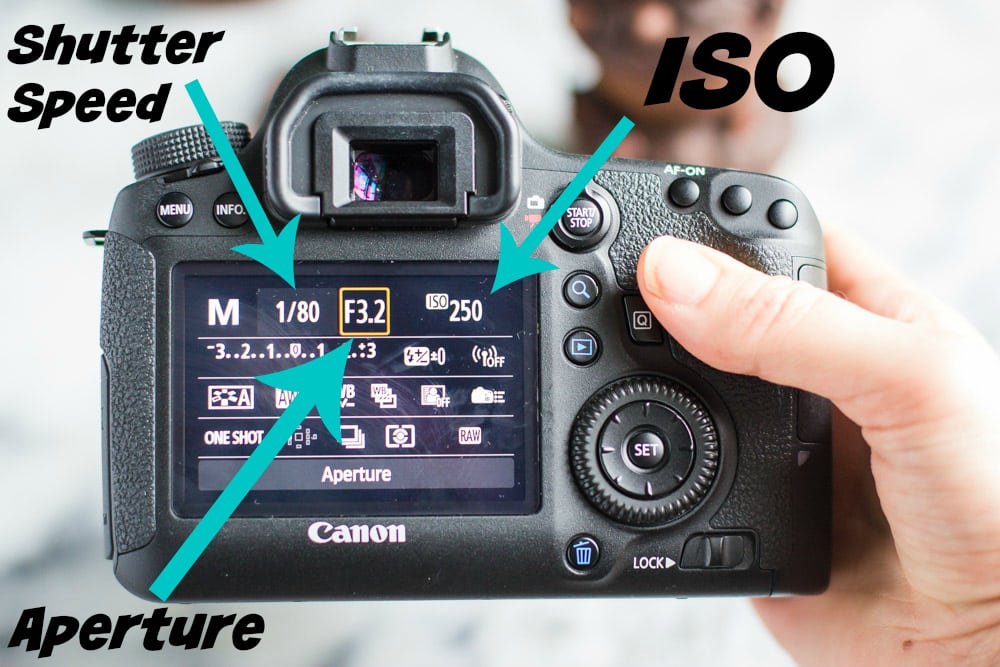
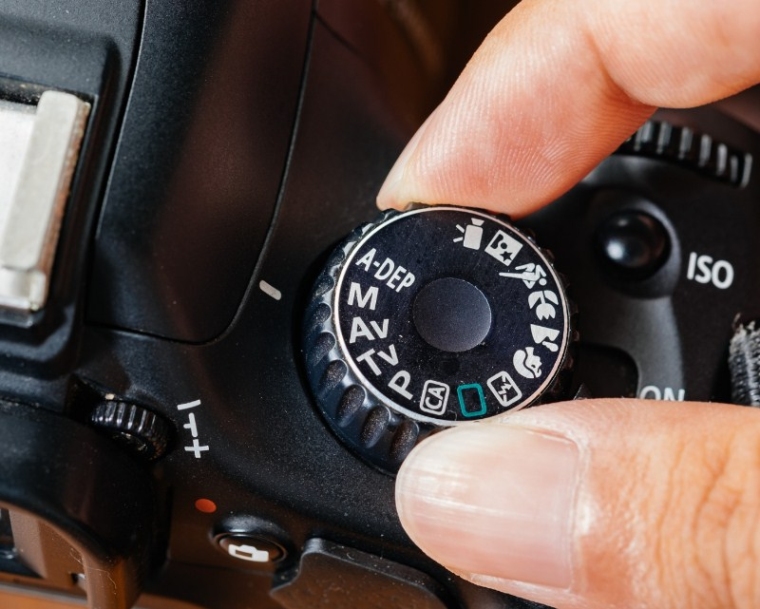
Manual mode on camera is a shooting mode that gives you direct control over the main exposure settings. On most cameras, you select it by turning the mode dial to M. The exact controls vary by camera, but the basic idea stays the same.
In an automatic mode, the camera picks many settings for you. In manual mode, you choose the key exposure settings based on the scene and the result you want. This does not mean you must control every part of the camera by hand.
Your camera can still use autofocus, image stabilization, and other features while you shoot in manual exposure mode. Manual mode mainly changes who controls the exposure.

- ✦ Aperture
Aperture controls the size of the lens opening. It also affects depth of field, which changes how much of the scene looks sharp.
- ✦ Shutter speed
Shutter speed controls how long the sensor receives light. It also affects motion blur and how sharply moving subjects appear.
- ✦ ISO
ISO controls the sensor’s light sensitivity setting. A higher ISO can help in dark scenes, but it can also add more image noise.
Why Does the Camera Have Manual Mode?
Automatic exposure works well in many everyday situations. But the camera cannot always know the look you want. A bright window, dark background, or moving subject can make automatic exposure choose settings that do not fit your goal.
- ✦ Creative control
You can choose a bright, dark, sharp, soft, frozen, or motion-filled look instead of accepting the camera’s first choice.
- ✦ Consistent exposure
You can keep similar exposure settings across a series of photos when the lighting stays stable.
The Exposure Triangle in Manual Mode
The exposure triangle is the basic idea behind manual mode on camera. It connects aperture, shutter speed, and ISO. These three settings work together to control exposure and affect the look of the photo.
Think of exposure as a balance. If you make one setting let in less light, you may need to change another setting to keep the same overall brightness. Once you understand this balance, manual mode becomes much easier.
There is no single correct setting for every photo. The best setting depends on the subject, light, movement, lens, and the look you want.

- ✦ Aperture controls light and depth
A wide aperture such as f/2 lets in more light and can create a softer background. A smaller aperture such as f/8 lets in less light and can keep more of the scene in focus.
- ✦ Shutter speed controls time and motion
A fast shutter speed can freeze action. A slow shutter speed can create motion blur and may require a tripod.
- ✦ ISO controls sensitivity and noise
A lower ISO often gives a cleaner image. A higher ISO can help you shoot in low light, but it may produce more visible noise.
How the Three Settings Work Together
Suppose a photo looks too dark. You could open the aperture, slow the shutter speed, or raise the ISO. Each choice changes the image in a different way. That is why manual mode is more than setting a brightness level.
For example, if you photograph a runner, a faster shutter speed may be more important than using a very low ISO. If you photograph a still landscape, a smaller aperture and a tripod may be more useful.
- ✦ Need more light
Try a wider aperture, slower shutter speed, or higher ISO, based on the effect you want.
- ✦ Need less light
Try a smaller aperture, faster shutter speed, or lower ISO.
How to Set Manual Mode on Camera
The exact controls differ between camera brands and models, but the basic process is similar. Start by turning the mode dial to M or selecting Manual from the camera’s shooting mode menu.
Next, set your aperture, shutter speed, and ISO. Look at the camera’s exposure meter, then take a test photo. Review the image and histogram if your camera provides one, and adjust the settings as needed.
Do not worry if your first few photos are too bright or too dark. That is part of learning manual mode. Small changes are often enough to correct the exposure.

- ✦ Step 1: Choose manual mode
Set the camera to M or select Manual exposure from the shooting mode menu.
- ✦ Step 2: Set ISO
Start with a low ISO in bright light. Raise it when you need more exposure and cannot slow the shutter or open the aperture enough.
- ✦ Step 3: Choose aperture
Pick an aperture based on the depth of field and amount of light you want.
- ✦ Step 4: Set shutter speed
Choose a shutter speed that suits the movement in the scene and the lens you are using.
- ✦ Step 5: Check exposure
Use the exposure meter, preview image, highlights, shadows, and histogram when available.
Use the Exposure Meter as a Guide
Most cameras show an exposure scale in the viewfinder or on the screen. It can help you see whether the camera thinks your settings may produce a darker or brighter image. Treat it as a guide, not an absolute rule.
A creative photo does not always need to sit at the meter’s center point. For example, a night scene may look better when it stays dark, while a bright snow scene may need more exposure than the meter suggests.
- ✦ Check the actual photo
Use the camera screen and histogram to judge the result, especially when the scene has strong contrast.
How to Choose Aperture in Manual Mode
Aperture is one of the most useful creative controls in manual mode on camera. It is written as an f-number, such as f/1.8, f/4, f/8, or f/16. The confusing part is that a smaller f-number means a wider opening.
A wide aperture lets in more light and often creates a shallow depth of field. This can help separate a person from a busy background. A smaller aperture lets in less light and can keep more of a landscape or group sharp.
Your lens also limits the aperture range. A lens may have a maximum aperture of f/1.8, while another lens may only open to f/4. The available range depends on the lens design.
- ✦ Portraits
A wider aperture can help blur the background and draw attention to the subject.
- ✦ Landscapes
A moderate or smaller aperture can help keep more of the scene sharp.
- ✦ Food photography
A wider aperture can isolate a dish, while a smaller aperture can keep more of the table or dish sharp.
- ✦ Groups
A moderate aperture can provide more depth of field than an extremely wide aperture.
Why f/2 Is Not the Same as f/8
The f-number is a ratio, so the scale feels backward at first. An f/2 setting has a wider opening than f/8. That means f/2 usually lets in much more light and creates a shallower depth of field.
A simple way to learn is to test two settings on the same subject. Keep the other settings close, then compare the background and overall brightness.
How to Choose Shutter Speed in Manual Mode
Shutter speed tells the camera how long to capture light. It is usually shown in seconds or fractions of a second, such as 1/1000, 1/250, 1/60, or 1 second. The right choice depends on how much movement you want to freeze or show.
A fast shutter speed is useful for sports, wildlife, children, and other moving subjects. A slower speed can work for still subjects, night scenes, light trails, or intentional motion blur.
Handholding also matters. If your shutter speed is too slow, your own movement can make the photo look soft. Image stabilization can help, but it does not freeze a moving subject.

- ✦ Fast shutter speed
Use a fast setting when you need to reduce motion blur and capture quick action
. - ✦ Medium shutter speed
A moderate speed can work well for everyday subjects that are not moving very fast.
- ✦ Slow shutter speed
A slow setting can create motion blur or capture more light, but a tripod may be needed.
Shutter Speed and Camera Shake
Camera shake happens when the camera moves while the shutter is open. You may notice it most in photos taken in low light. A faster shutter speed can reduce this problem when you are shooting handheld.
If you need a very slow shutter speed, use a solid tripod when possible. Keep the camera still and use a timer or remote trigger if pressing the shutter button causes movement.
How to Choose ISO in Manual Mode
ISO is another key part of manual mode on camera. A low ISO is often useful in bright conditions. A higher ISO can help when the scene is dark and you need to keep a useful shutter speed or aperture.
The trade-off is image noise. As ISO rises, many cameras show more grain and lose some fine detail. Modern cameras can handle high ISO values well, but the result still depends on the camera, lighting, and final image size.
Do not fear higher ISO. A sharp photo with some noise is often more useful than a blurry photo made with an ISO that was kept too low.
- ✦ Bright daylight
A low ISO is often enough when there is plenty of light.
- ✦ Indoor scenes
A moderate ISO may help you keep a usable shutter speed without needing a very wide aperture.
- ✦ Night photography
A higher ISO can help, especially when you are shooting handheld, but a tripod may let you use a lower ISO.
Should You Always Use the Lowest ISO?
No. The lowest ISO is not always the best choice. If a low ISO forces you to use a shutter speed that is too slow, the photo may become blurry.
Think about the final goal. For a still subject on a tripod, a low ISO can make sense. For a moving subject, getting a fast enough shutter speed may matter more.
Manual Mode on Camera for Different Types of Photography
The best manual settings depend on the subject. A wedding reception, a sunny beach, and a night street scene need very different exposure choices. Instead of memorizing one setting, learn how to choose settings from the scene in front of you.
Manual mode can also help when you want several photos to have a similar exposure. This is useful when the light stays fairly steady. If the light changes often, another exposure mode may be faster.

- ✦ Portrait photography
Start by choosing the aperture for the desired background blur. Then set a shutter speed that keeps the person sharp and adjust ISO for the available light.
- ✦ Landscape photography
Choose an aperture that gives the depth of field you need. If the subject is still, a tripod can let you use a slower shutter speed and lower ISO.
- ✦ Sports photography
Start with shutter speed because motion is the main concern. Then choose aperture and ISO to reach a useful exposure.
- ✦ Night photography
Use a tripod for still scenes when possible. A slow shutter speed and low ISO can produce clean results, while moving subjects may require a faster shutter and higher ISO.
- ✦ Food photography
Choose aperture based on how much of the dish you want sharp. Watch shutter speed if you are shooting handheld.
Manual Mode for Indoor and Window Light
Indoor light can change quickly. A bright window may create a large difference between the subject and background. Manual mode lets you choose an exposure that matches the look you want instead of allowing the meter to react to every small change.
For a still subject, place the camera on a stable surface or tripod if needed. Then adjust aperture, shutter speed, and ISO while watching the highlights and shadows.
Manual Mode vs Automatic and Semi-Automatic Modes
Manual mode is not automatically better than every other camera mode. It is simply a different way to control exposure. The right mode depends on how much control you need and how quickly you need to work.
Program, aperture priority, and shutter priority can also produce excellent photos. Many experienced photographers switch between modes based on the job. Knowing when to use each mode is more useful than staying in one mode all the time.
- ✦ Automatic mode
The camera makes most exposure choices for you. It is useful when speed and simplicity matter.
- ✦ Aperture priority
You choose the aperture while the camera chooses shutter speed. It is useful when depth of field is your main concern.
- ✦ Shutter priority
You choose the shutter speed while the camera chooses aperture. It can be useful when controlling motion is the main goal.
- ✦ Manual mode
You choose the main exposure settings yourself. It is useful when you want direct and consistent control.
When Manual Mode May Not Be the Best Choice
Manual mode can slow you down when the light changes from moment to moment. For fast-moving events, a semi-automatic mode may let you react faster while still controlling the most important part of the exposure.
There is no rule that says a skilled photographer must use manual mode all the time. The goal is to get the photo you want with the least unnecessary effort.
Common Manual Mode Mistakes Beginners Make
Learning manual mode on camera takes practice. Most beginners make the same few mistakes, and each one is easy to fix once you know what to watch for.
The biggest mistake is trying to learn every control at once. Start with the exposure triangle, then add focus, white balance, metering, and other tools as you become comfortable.
- ✦ Using a shutter speed that is too slow
A slow shutter can cause blur when you shoot handheld. Raise the shutter speed when you need a sharper moving subject or steadier handheld photo.
- ✦ Using an aperture that is too wide
A very wide aperture can make the depth of field extremely shallow. Parts of a face or group may fall outside the sharp area.
- ✦ Keeping ISO too low at all costs
A very low ISO is not helpful if it forces you to use a shutter speed that causes blur.
- ✦ Ignoring the background
Good exposure cannot fix a distracting background. Check the whole frame before taking the
photo. - ✦ Trusting the meter without checking the scene
A camera meter can be fooled by very bright or very dark scenes. Use the histogram, highlights, shadows, and your creative intent as extra guides.
- ✦ Changing several settings without knowing why
If you change aperture, shutter speed, and ISO together, it becomes hard to learn what each control did. Change one setting at a time during practice.
A Simple Way to Practice
Pick a still subject near a window. Keep the camera in one place and take several photos. Change only the aperture first, then only the shutter speed, and finally only the ISO.
Look at each set on a computer or tablet. Notice background blur, motion, brightness, and noise. This simple exercise can teach more than trying to memorize a long list of settings.
Practical Manual Mode Settings to Try
There are no universal manual settings because light and subjects change. Still, starting points can make practice easier. Use them as a guide, then adjust based on the scene and the result you want.
For bright outdoor portraits, you might start with a wide or moderate aperture, a fast enough shutter speed for your subject, and a low ISO. For a night landscape on a tripod, you may use a smaller aperture, a slow shutter speed, and a low ISO.
- ✦ Outdoor portrait starting point
Try a wide or moderate aperture, a shutter speed fast enough to avoid subject and camera movement, and a low ISO when light allows.
- ✦ Indoor portrait starting point
Use an aperture that gives enough depth of field, keep the shutter speed high enough for a sharp person, and raise ISO as needed.
- ✦ Landscape starting point
Try a moderate aperture, low ISO, and a shutter speed that fits the scene. Use a tripod when the shutter becomes too slow for handheld shooting.
- ✦ Sports starting point
Start with a fast shutter speed. Choose an aperture that gives enough light and depth of field, then adjust ISO to complete the exposure.
- ✦ Night street starting point
Balance a usable shutter speed with the aperture and ISO. Higher ISO may be useful when you need to shoot handheld.
Why Starting Points Are Not Rules
A setting that works in sunny Texas may fail in a dim restaurant. A setting that works for a still building may fail for a moving cyclist. Treat camera settings as tools, not fixed recipes.
The more you practice, the faster you will learn to predict what needs to change. That is the real benefit of learning manual mode.
Extra Camera Settings That Matter in Manual Mode
Manual exposure does not mean exposure is the only thing you should think about. Focus mode, white balance, metering, file type, and image stabilization can also affect the final image.
You do not need to master all of these settings on day one. Learn them one at a time after you understand aperture, shutter speed, and ISO.
- ✦ Autofocus mode
Choose a focus mode that suits the subject. A moving subject often needs a continuous autofocus mode, while a still subject may work well with single autofocus.
- ✦ White balance
White balance controls how warm or cool colors look. Auto white balance works well in many scenes, while manual choices can help keep color consistent.
- ✦ Metering mode
Metering tells the camera how to judge scene brightness. Different modes can focus on different parts of the frame.
- ✦ RAW files
RAW files keep more image data for editing than compressed JPEG files, though they take more storage and need processing.
- ✦ Image stabilization
Stabilization can reduce the effect of camera movement, but it does not stop a moving person or animal from becoming blurred.
Manual Focus vs Manual Exposure
Manual exposure and manual focus are different things. You can shoot in manual exposure mode while still using autofocus. This is useful because you can control exposure without giving up the speed of autofocus.
Use manual focus when autofocus struggles or when you need a fixed focus point. For most everyday subjects, autofocus can be a practical choice even when exposure is fully manual.
A Beginner Workflow for Manual Mode on Camera
A simple workflow makes manual mode much less stressful. Before taking the photo, decide what matters most: depth of field, motion, or image quality. Then set the control that matters most and build the rest of the exposure around it.
For example, a portrait photographer may start with aperture because background blur matters. A sports photographer may start with shutter speed because motion matters. This approach helps you make decisions instead of guessing.
- ✦ 1. Check the light
Look at whether the scene is bright, shaded, indoors, or dark. Notice strong windows, lamps, and deep shadows.
- ✦ 2. Decide your creative priority
Choose whether depth of field, motion control, or low noise matters most for the photo.
- ✦ 3. Set the main control
Set aperture for depth of field, shutter speed for motion, or ISO when light is the main limit.
- ✦ 4. Balance the exposure
Adjust the other two settings until the exposure looks right for your scene.
- ✦ 5. Take a test photo
Check focus, highlights, shadows, motion, and overall brightness.
- ✦ 6. Make a small adjustment
Change one setting at a time when possible, then take another photo.
The One-Setting-at-a-Time Rule
When you are learning manual mode on camera, make one clear change at a time. If the photo is too dark, decide whether you want more light through the aperture, shutter, or ISO.
This creates a direct link between the control and the result. After enough practice, you will start making several linked decisions quickly without thinking about each step.
Frequently Asked Questions about manual mode on camera
Recent Posts
Advantages of DSLR Camera: 10 Key Benefits for Photographers
Discover the advantages of DSLR cameras, from image quality and lens choice to manual control, battery life, speed, and low-light performance.
Pros and Cons Mirrorless Camera: A Complete Guide for Photographers
Explore the pros and cons mirrorless camera buyers should know, from light weight and fast autofocus to battery life, cost, and lens choices.